8 Elegant No-Cut Pumpkin Decorations

8 Elegant No-Cut Pumpkins! Adorable!

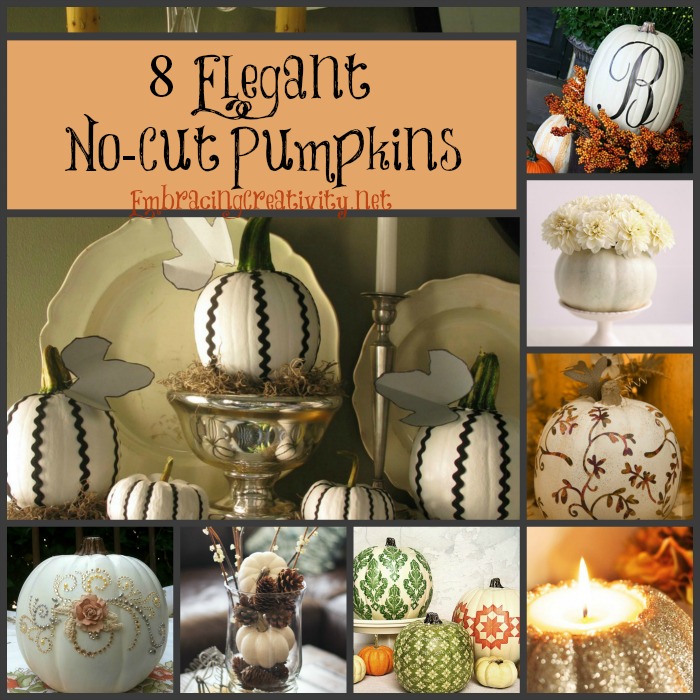
Here are 8 Elegant No-Cut Pumpkin decorations that I’m excited to share!  Pumpkins are one of the things I love most about fall.  Here are the tutorials in order from the top right, clockwise, to the big picture in the middle.

Happy crafting!

  • – 1.  This monogram pumpkin tutorial is from RadioButlers.  I love that this design doesn’t involve an expensive Cricut or Silhouette machine to make.
  • – 2.  Martha Stewart is someone we can always turn to for a holiday craft and she doesn’t disappoint with her pumpkin vase with flowers tutorial.  Absolutely lovely!
  • – 3.  This decoupaged pumpkin from svgcuts is so sweet and looks very simple to create.
  • – 4.  The glitter candle holder from Twig & Thistle is just darling.  It does involve a little cutting but it’s very little and on a styrofoam pumpkin.
  • – 5.  Confessions of a Plate Addict has a different take on decoupaged pumpkins and I love it!
  • – 6.  Shanty 2 Chic shows us how to create a lovely pumpkin centerpiece using white pumpkins and pine cones.
  • – 7.  Life on Lakeshore Drive demonstrates how to create an elegant pumpkin using leftover scrapbook supplies.  Genius!
  • – 8.  Last but not least, Eddie Ross shows us how to make an attractive mantle display using pumpkins, paint, and rick rack.

I hope you feel invigorated and ready to start decorating pumpkins.  I know I sure do!!

13 Halloween Crafts Using Baby Food Jars

13 Halloween Crafts Using Baby Food Jars - Adorable!

If you are like me you hate throwing away baby food jars.  These jars have such a nice shape and they’re in perfectly good condition after only being used once.  Our family is temporarily out of the baby food stage right now but with a little one on the way it won’t be long before I’ll have more tiny glass jars coming in.  Call it nesting, or being creative but lately I’ve been thinking of new ways to organize and reuse the things we already have.  We have plenty of leftover baby jars because it was so hard to put them all in the recycle bin and today I decided I want to find a good use for these jars.  Some may end up holding lost buttons, spare change, or my daughter’s crayons but some will definitely be used to make some crafts.

Today, I have a round up of adorable Halloween crafts to share with you.  I hope you’ll enjoy them!  If you do please feel free to pin the image above to share these ideas with others.

Let’s get started!

1.) The 36th Avenue shows you how to make glitter slime and adorable glitter monster jars to hold the slime!

2.) The uber talented Martha Stewart has a tutorial on how to make Jar-O’-Lanterns (the name is even cute!).

3.) ThinkCrafts.com has a simple tutorial to turn a jar into a chalkboard pumpkin. They don’t use baby food jars but I think they could easily be substituted.

4.) Crafts by Amanda has a brilliant idea for using old lids from bottles to make monster faces.  Again, you could easily substitute baby food jar lids here.

5.) Pink Cake Plate shares a simple craft using dollar store items and baby food jars (or other jars) to make owl apothecary jars.

6.) Kerry on Family Crafts shares how she easily turned full baby food jars into spooky decor.

7.) SmallTypes.com has a tutorial for turning baby food jars, wire, and stickers into a sweet mantle decoration.

8.) TheAutoCratHaley.com shares a simple ten minute craft for making sweet treat jars.

9.) Lil’ Luna tells how she baked mini cakes inside a small mason jar and I think this would also work in a large baby food jar.  Yum!

10.) Michelle Paige has a unique take on Halloween goodie jars.  She uses black and white houndstooth duct tape on the outside and marshmallow peeps on the inside.  Cute and sweet!

11.)  Crafts Redesigned shares a simple tutorial to make a not-so-frightening mummy luminary.

12.) I Heart Nap Time tells how she made cute gift jars using scrapbook paper, ribbon, and lace.  This is adaptable for any occasion!

13.) BHG.com shares how to make an adorable Frankenstein face candy jar using a baby food jar and items from a craft store.

That’s all the jar crafts I have to share for now but keep checking back because I’m sure I’ll find some more creative ways to use baby food jars and maybe I’ll even show you a few ways we’re already using them in our home.

What ways do you repurpose baby food jars?

Free Printable Father’s Day Card for Kids

Printable Father's Day Card - So CUTE!

If you are looking for a unique Father’s Day card or gift then this is for you!  My daughter is just at the age where she can begin answering questions and I tell you, I love some of the answers she gives.  I thought this questionnaire would be a fun way for her to say Happy Father’s Day to her Daddy while at the same time giving us a keepsake to remember her at this age.

No mater the age of your children, the answers will always be funny and some may even be sweet.

There are quite a few different things you can do to make this printable a keepsake.  You might want to fold this and make it into a card.  Trust me, the answers will be so funny that Dad will want to keep this card!  You can also print this off, fill it out, and then frame it for Dad to hang in his office.

*Tip* When you ask these questions to your children be patient and give them time to answer on their own.  Don’t try and make them say what you want them to.  The best part of this is letting them come up with the answers all on their own.

Are you ready to get started? Go here to make your own Printable Father’s Day Card.  Enjoy!

Cinco de Mayo Party Ideas

Cinco de Mayo Party Ideas

Cinco de Mayo is coming up on May 5th and I have a great round up of party ideas for you.  There are creative food recipes, free printables, and DIY decoration ideas to help make your party fun and festive!


Cinco de mayo pinata cookies

1. DIY Piñata Cookies – These are the perfect cookies for Cinco de Mayo!  They look like adorable, unsuspecting cookies until you break them open and you find extra treats inside.  Yum!  Check out the step by step instructions on how you can make your own piñata cookies.


Amazing Queso Recipe

2. Amazing Queso Recipe – This is my own recipe for queso but I promise you, it’s amazing!  Everyone who tries it asks for the recipe.  I think it’s perfect dip for a Cinco de Mayo party.


Sombrero Cookies

3. Cinco de Mayo Sombrero Cookies – Aren’t these sombrero cookies adorable?  Learn how you (or your kids) can transform plain store bought cookies into festive sombrero cookies.  Ole!


DIY Papel Picado Flags

4. DIY Papel Picado Mexican Banner – Papel Picado is a traditional Mexican banner and this simple DIY tutorial will have you cutting intricate designs into tissue paper like a pro.


Mini Pinata Favors

5. Mini Pinata Party Favors – After everyone has taken a swing at the full size piñata you can send each of your guests home with a mini version of their own.


Muchas Gracias Printable

6. Cinco de Mayo Party Favor Bags – If you’re making your own party favor bags this printable design can really put them over the top!  This design was printed onto vellum and then each one was filled with homemade pralines.  Yum!

Thanks for reading my round up and thank you to all of the blogs who allowed me to share their genius!

Make a Pretty Spring Wreath!

I’ll admit it: I’ve had coffee filter wreath-envy ever since a friend made one at Christmastime.  It was lacy-white, beautiful in its simplicity, and striking with a bright ribbon ready for the hanging.

I wanted one.  I needed one.  But Christmas came and went and oh!  I never made one.

But I couldn’t get it out of my mind.

I began dreaming of a coffee filter wreath fit for spring.  I wanted something softly variegated, like tea roses, something that would make my spring mantel pop and my front door say “Welcome.”

I wanted something like this:

DIY Coffee Filter Wreath

It’s breathtaking.

It’s inexpensive.

And, it’s a very simple project to undertake.  In fact, you can start today.

First, gather the following supplies:

*1 foam wreath form, 12”

*Extra yarn, ribbon, or fabric strips, enough to cover the wreath form, optional

*I package of white basket-style coffee filters (I used 3” filters)

*Hot glue gun and plenty of glue sticks

*Ribbon to finish

*Food coloring

*I cup strong black tea, cooled

Step 1—Wrap the Wreath Form

I like to wrap foam wreath forms in a coordinating ribbon, yarn, or fabric strips.  This is not completely necessary but it allows me to be a little less perfect in the placement of my coffee filter flowers because  it doesn’t matter if a little bit shows through between the flowers.

Also, I like my wreaths to be finished on all sides.  It gives a nice, professional appearance to the final product.

Step 2—Dye the Filters

Variegated Coffee Filter Wreath

Using food coloring, dye several bowls of water any shades you like.  Keep in mind that the colors will dry lighter, so don’t be afraid to make deep, concentrated hues.  I used red, purple, green, and blue.  I also brewed a cup of strong black tea because I wanted some of my filter flowers to resemble dried roses.  The flowers I double-dipped in tea ended up being my favorites.

Working in batches of 5-8 filters at a time, begin by folding the filters into half, and then half again so you’re working with a manageable quarter-circle.   Scallop the edges with a scissors so they will look like flower petals when you fold them.

Dip the wider end of the circle into the color of choice.  Take it out of the water and allow the color to seep to the middle.  Double dip, if desired, in another color until you get the look you want.  The filter will draw the colors into the middle, lightening as it goes.

Be sure to dye at least 100 filters.  You will need all of them for this project!

Step 3—Drying

To dry, spread the filters flat on a cookie sheet and place them in a warm oven.  There is no need to separate them.  Just keep them in the groups you dyed them in.  But be sure to turn off the oven once you put the filters in to prevent them from burning.  Rotate occasionally until dry.

If you have a food dehydrator, you can use it to dry the filters.  They dry very rapidly on the highest setting so check back often.

Step 4—Create Filter Flowers

Creating flowers out of the dyed filters is time consuming.  There’s no way around it.  So, plug in your glue gun, put on some great music, and plan to stay awhile.

You don’t really need directions from this point on, but if you’d like to know what I found to be the most effective technique for making filter flowers, read on. 

DIY Coffee Filter Flowers

Click on the photo for a close-up look.

Working in batches of 4-5 filters, fold the filters into fourths.  Cut circles out of the centers of the filters using a scalloped cut.  Unfold.  You should have two parts: a scalloped circle (the center of your flower) and a large, scalloped outer ring.

Take the center circle and put a dot of hot glue in the middle.  Pinch it together, bringing the scalloped edges up and rolling it slightly until it resembles the center of a flower.

Now, take the larger outer ring.  Make it into a flat figure 8, securing the inner edges with a dab of hot glue where they come together.  Place the flower center right onto the middle of the figure 8, glue and fold the edges up so they look like more petals.

You should have two loops on either side of the flower center.  Glue the middles of those two loops to the center flower.  You will have a few more smaller loops now.  Glue those to the center as well, always folding and gluing as necessary to create flowers.

Don’t worry if they’re not perfect.  Once you glue them onto the wreath, most of the imperfections won’t show anyway.

Set aside and repeat until you wonder what possessed you to do this project in the first place.

Coffee Filter Flowers

Step 5—Arrange the Flowers

I decided to group bunches of like-colored flowers in a pattern around my wreath, but a random pattern would be just as pretty.  Do what you like!

Save any “flower failures” to fill in the bare spots where no one will see.

Coffee Filter Wreaths

Step 6—Finish

Your choice of ribbon will determine the feel of your project.  A wide ribbon is elegant while a bright, thin ribbon is fun and festive.  Embrace your creativity until you find a look you love.

Then, enjoy your beautiful wreath all season long.

Coffee Filter Wreath Ideas