100 Days of School Shirt Idea

This post contains affiliate links for your convenience.

Do you remember being in elementary school and celebrating 100 days of school?  I do, I can remember it just like it was yesterday.  One of the teachers wore the same shirt every year.  Her shirt that had 100 sequins that she has sewn on.  The sequins looked just like these!  Oh, the memories.

The week that surrounded the 100th day of school was filled with fun counting projects.  I can remember a paper chain we made that had 100 links in it.  We of course counted out 100 pennies too.  I miss the innocence of elementary school sometimes.

Nowadays I’ve noticed, via Facebook friends, that it’s customary to wear a hundred items on your shirt.  My elementary school teacher had it right all these years!  While I’m homeschooling and don’t find it necessary to craft a shirt just for one day for only my immediate family to see I thought I would share this cute 100 day of school shirt idea that my friend made for her daughter.

100 Days Shirt

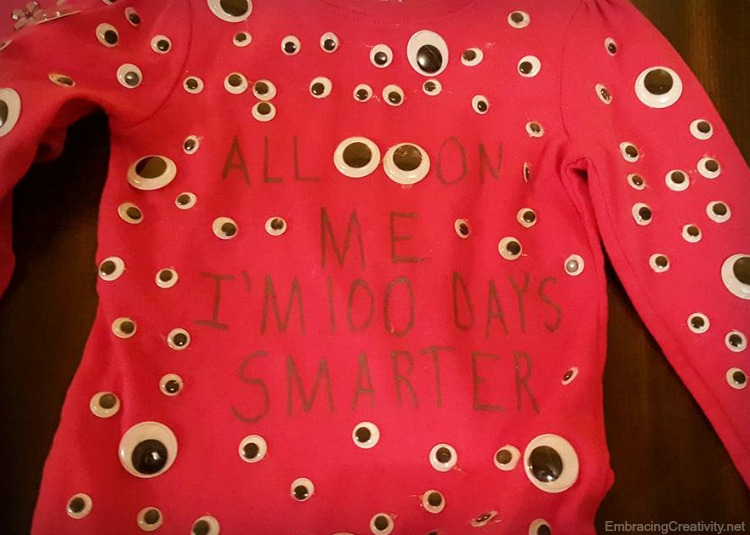
She just glued of a 100 googly eyes and wrote on it.  Simply adorable!

It says, “All eyes on me.  I’m 100 days smarter.”  I just love it.  Mainly because I have an unexplainable love of googly eyes.  On second thought, maybe I’ll make this shirt for my daughter after all.  And one for myself. :)

ReUse, ReDesign, ReStore

Recently, I tried my hand at refinishing and reupholstering a side chair.

The sad, little, throwaway chair was scratched, dented and had a broken seat.

I set my mind to creating something useful and pretty, so with persistence and a lot of patience, I worked hard to turn out a sweet pink treasure!

Slide1 (2)

Being a Southern girl and very much a girly-girl, you will notice that I indeed added a monogram and a bit of pink and sparkle. :)

I have had the privilege to volunteer at my local Habitat for Humanity ReStore for many years. I work along side of some very creative friends, with an eye for possibility and a lot of imagination we take the donated items reimagine them, rearrange them and remake them into new creations for the ReStore to sell.

We also use many of the donated items to style “rooms” so the customer can get an idea of how they might use the items in their own homes.

Did you know Habitat for Humanity Restores are nonprofit home improvement stores and donation centers that sell new and gently used furniture, appliances, home accessories, building materials and more to the public at a fraction of the retail price?

Each ReStore is independently owned and operated by local Habitat for Humanity organizations. Proceeds are used to build homes, community, and hope locally and around the world.

I can’t begin to tell you how much fun it is to volunteer with my amazing friends. Each of us is humbled to know that our small contribution of time and talent goes a long way in helping to provide homes and hope for needy families.

One of our favorite Redesigns has been converting a small entertainment center into child-sized “kitchen”.  

Slide1 (3)

If you haven’t visited your local Habitat for Humanity ReStore, I would highly recommend that you put it on your To Do list or if you have gently used furniture, home accessories, building materials or gently used appliances, please consider donating to this non-profit organization. Better yet, offer to volunteer., you just might find you have the gift of reusing, redesigning and restoring.

Knitted Baby Dress Pattern

This post contains affiliate links.
Knitted Baby Dress Pattern

Today is the second day of our 31 Days of Knitted Gifts!  Our previous two projects can be found here.  This sweet knitted dress is perfect for fall.  Just picture it paired with leggings and baby boots.  Absolutely adorable!  Oooh, and if you added stocking and gold shoes with a gold hair bow it would be perfect for Christmas!

Needle and yarn
Needle:

US 7 – 4.5 mm

Pattern: This free pattern can be found on Ravelry.com.

Notes:

Followed the listed pattern through row 27, doing seed stitch instead of ribbing between the leaves. On row 28 did 25 stitches in seed stitch, bound off 31, 50 seed stitch, bound of 31, 25 seed stitch (last stitch knit 2 together). Couple more rounds of seed stitch…then I knit 3 rounds in st st, one round of purl, and started Flora dress with 9 repeats of chart A.  I knit one round then 3 rounds of seed stitch to finish.

31 Days of Knitted Gifts

This post contains affiliate links.
31 Days of Knitted Gifts

This month I’ll be sharing a DIY knitted gift idea with all the details for making them.  I hope you’ll follow along with me.  {I’ll be posting the first one later today after I wake up a bit. tomorrow after I get some meds in me.  I hate being sick, I’m sorry!} :)

Knitted Booties Pattern

The first knitted project I have to share adorable little knitted booties to cover itty bitty little sweet baby feet!

Needle and yarn

In addition to the eggplant Knit Picks yarn there was a little hand-spun yarn (from a fiber festival) for the contrast color.

Pattern: From Ravelry.com (This one’s free!)

Notes:

There are lots of ends to weave in, but cute and easy.  I made the large size and they are still very tiny.

Here’s is the master list of 31 Days of Knitted Gifts:

Day 2: Baby Apple Hat

Day 3: Baby Dress

13 DIY Kids Halloween Costumes

13 DIY Kids Halloween Costumes

Halloween will be here before we know it! Some of my best memories as a child are dressing up and going trick or treating, and now it is my turn to share those memories with my kiddos! I have been on the hunt for some great DIY kids costumes and I came up with a great list, so I had to share! This list has it all, from Disney princesses to super heroes. What do your little ones want to be this year? Tell me below! I am always on the look out for more great ideas! Be sure to pin, tweet, and share! Happy costume making!

  1. Disney’s Brave (PICTURED)
  2. Baby Lion Tutu (PICTURED)
  3. Magic Man (PICTURED)
  4. Where the Wild Things Are (PICTURED)
  5. Minnie Mouse (PICTURED)
  6. Mister Rogers & the gang
  7. A-Team
  8. Minions
  9. Mermaid
  10. Mega Blocks
  11. TMNT Tutu
  12. Scuba Diver
  13. Super Hero

DIY Chandelier Planter

Chandelier Planter

A college friend of mine, Megan, showed me this chandelier planter that she created and I absolutely loved it.  She gave me permission to share her work of art with you and was kind enough to write out how she did it.  I’ll turn it over to her now.

I used an old brass chandelier that was laying around our basement.  I had my husband remove the electrical wiring and elements.  Then I glued a terra cotta saucer and pot to each other, and on each of the chandelier’s arms. I used Elmer’s Pro-Bond Advanced Glue. It’s supposed to work on any material, and it worked for my terra-cotta to metal combo!  I hung the chandelier when dry and painted with a paint/primer combo (Valspar Tropical Oasis). I finished mine with a clear enamel spray paint because I had some left over from another project, but I think a specific sealant spray would have been better. Super easy! I only had to pay for the pots, which are pretty cheap at Lowe’s, and a can of spray paint!

There you have it folks!  An easy, cost-effective way to add a little DIY charm to your home.

If you have a creative party, recipe, or DIY and would like to be featured on Embracing Creativity we would love to see it!  You can submit your creativeness here.

Homemade T-shirt Tote

t-shirt-tote

CreativeGreenLiving.com shows you how to make a homemade tote bag out of a old t-shirt.  Isn’t it adorable!?!  I’d love to make one (or ten) of these!

Frozen Olaf Pumpkin

Frozen Olaf Pumpkin

By now, you’ve already been bombarded with 5 dozen sweet Elsa’s knocking on your door to say trick-or-treat, you’ve already handed out all of your candy, and you may have even put away all of your Halloween decor.  I know, I know, it’s a little late to be posting about a pumpkin but this Olaf inspired pumpkin was too cute not to show you.  Isn’t it darling?  A friend of mine made this Olaf pumpkin with her sweet daughter and gave me permission to share it.  I just love it!

DIY Monogram Wall Art

DIY Monogram Wall Art!

This simple DIY is all about making something individualized and colorful for your home. Using glass pebbles a wooden letter, and a few things you probably having lying around your house, we’re going to create a stylish initial to liven up any bare wall.

Okay, so here we go. All you need is the letter of your choice, glue (a hot glue gun worked great, available at any craft store), a wooden frame (it’s optional but this one came from Dahlia’s Flowers) and glass pebbles (or gems, marbles, fish tank decorations. You know what I’m talking about, right?).  Keep in mind the color of your letter when choosing the color of your pebbles.  Since they are slightly see through your background color will make a difference.

Instructions:

  1. Buy supplies.
  2. Arrange pebbles on your letter to suit your taste. Remove row of pebbles from your letter and glue them back into place one or two at a time. Continue to fill in the entire letter, section by section, until complete.
  3. Allow a few minutes for the last pebbles to dry before hanging.
  4. If you want to hang a bare frame around your letter you would do that now otherwise you’re finished.  Yay!
  5. Stand back and admire your creative and inexpensive piece of art!

This DIY Monogram wall art would make a great baby gift for new parents.

DIY Letter Art

Just look how cute it is above the crib in my friend’s nursery!

Simple DIY Wall Art

If you found this helpful, pin it so you can share it with others and access it later!

Thank you, Stephanie for sharing your simple DIY monogram art!  If YOU have a project you would like featured you can submit it here.

Make a Pretty Spring Wreath!

I’ll admit it: I’ve had coffee filter wreath-envy ever since a friend made one at Christmastime.  It was lacy-white, beautiful in its simplicity, and striking with a bright ribbon ready for the hanging.

I wanted one.  I needed one.  But Christmas came and went and oh!  I never made one.

But I couldn’t get it out of my mind.

I began dreaming of a coffee filter wreath fit for spring.  I wanted something softly variegated, like tea roses, something that would make my spring mantel pop and my front door say “Welcome.”

I wanted something like this:

DIY Coffee Filter Wreath

It’s breathtaking.

It’s inexpensive.

And, it’s a very simple project to undertake.  In fact, you can start today.

First, gather the following supplies:

*1 foam wreath form, 12”

*Extra yarn, ribbon, or fabric strips, enough to cover the wreath form, optional

*I package of white basket-style coffee filters (I used 3” filters)

*Hot glue gun and plenty of glue sticks

*Ribbon to finish

*Food coloring

*I cup strong black tea, cooled

Step 1—Wrap the Wreath Form

I like to wrap foam wreath forms in a coordinating ribbon, yarn, or fabric strips.  This is not completely necessary but it allows me to be a little less perfect in the placement of my coffee filter flowers because  it doesn’t matter if a little bit shows through between the flowers.

Also, I like my wreaths to be finished on all sides.  It gives a nice, professional appearance to the final product.

Step 2—Dye the Filters

Variegated Coffee Filter Wreath

Using food coloring, dye several bowls of water any shades you like.  Keep in mind that the colors will dry lighter, so don’t be afraid to make deep, concentrated hues.  I used red, purple, green, and blue.  I also brewed a cup of strong black tea because I wanted some of my filter flowers to resemble dried roses.  The flowers I double-dipped in tea ended up being my favorites.

Working in batches of 5-8 filters at a time, begin by folding the filters into half, and then half again so you’re working with a manageable quarter-circle.   Scallop the edges with a scissors so they will look like flower petals when you fold them.

Dip the wider end of the circle into the color of choice.  Take it out of the water and allow the color to seep to the middle.  Double dip, if desired, in another color until you get the look you want.  The filter will draw the colors into the middle, lightening as it goes.

Be sure to dye at least 100 filters.  You will need all of them for this project!

Step 3—Drying

To dry, spread the filters flat on a cookie sheet and place them in a warm oven.  There is no need to separate them.  Just keep them in the groups you dyed them in.  But be sure to turn off the oven once you put the filters in to prevent them from burning.  Rotate occasionally until dry.

If you have a food dehydrator, you can use it to dry the filters.  They dry very rapidly on the highest setting so check back often.

Step 4—Create Filter Flowers

Creating flowers out of the dyed filters is time consuming.  There’s no way around it.  So, plug in your glue gun, put on some great music, and plan to stay awhile.

You don’t really need directions from this point on, but if you’d like to know what I found to be the most effective technique for making filter flowers, read on. 

DIY Coffee Filter Flowers

Click on the photo for a close-up look.

Working in batches of 4-5 filters, fold the filters into fourths.  Cut circles out of the centers of the filters using a scalloped cut.  Unfold.  You should have two parts: a scalloped circle (the center of your flower) and a large, scalloped outer ring.

Take the center circle and put a dot of hot glue in the middle.  Pinch it together, bringing the scalloped edges up and rolling it slightly until it resembles the center of a flower.

Now, take the larger outer ring.  Make it into a flat figure 8, securing the inner edges with a dab of hot glue where they come together.  Place the flower center right onto the middle of the figure 8, glue and fold the edges up so they look like more petals.

You should have two loops on either side of the flower center.  Glue the middles of those two loops to the center flower.  You will have a few more smaller loops now.  Glue those to the center as well, always folding and gluing as necessary to create flowers.

Don’t worry if they’re not perfect.  Once you glue them onto the wreath, most of the imperfections won’t show anyway.

Set aside and repeat until you wonder what possessed you to do this project in the first place.

Coffee Filter Flowers

Step 5—Arrange the Flowers

I decided to group bunches of like-colored flowers in a pattern around my wreath, but a random pattern would be just as pretty.  Do what you like!

Save any “flower failures” to fill in the bare spots where no one will see.

Coffee Filter Wreaths

Step 6—Finish

Your choice of ribbon will determine the feel of your project.  A wide ribbon is elegant while a bright, thin ribbon is fun and festive.  Embrace your creativity until you find a look you love.

Then, enjoy your beautiful wreath all season long.

Coffee Filter Wreath Ideas