By now, you’ve already been bombarded with 5 dozen sweet Elsa’s knocking on your door to say trick-or-treat, you’ve already handed out all of your candy, and you may have even put away all of your Halloween decor. I know, I know, it’s a little late to be posting about a pumpkin but this Olaf inspired pumpkin was too cute not to show you. Isn’t it darling? A friend of mine made this Olaf pumpkin with her sweet daughter and gave me permission to share it. I just love it!
Turn a Canvas Print into a Hidden Jewelry Holder
I’m a paranoid person by nature so I know all of the tricks and secrets to truly hide jewelry, money, and other valuables from would-be thieves. I know them, however, I don’t always follow them. For instance, one of the big no-nos you shouldn’t do is to keep all of your valuables in one location. Aka a jewelry box. It’s so hard not to though, isn’t it? You don’t want to go rummaging around in your sock drawer for your favorite necklace only to find that after pulling out every sock that it was in your faux John Grisham novel.
It’s convenient to store all of your jewelry in one well visible jewelry box but it’s not always the wisest idea. My good friend who was recently robbed can attest to this. Her house was broken into in a 30 minute window of time and all they grabbed was a laptop, DS, and, you guessed it, her jewelry box.
When Brandy from Brandy’s Big Bargains told me about how she was turning a cheap canvas print into a hidden jewelry holder I was interested. While I would love a safe in the wall behind an elegant photo I’ve got to be realistic and know that that will never happen. This DIY Canvas Hidden Jewelry Holder, now that I can do!
Here’s what you need:
- She bought a $9.99 canvas from Home Goods but any canvas print with an open back will do!
- 2 Hinges.
- Screws and anchors (enough for your size hinges).
- Hooks (as many as you’d like).
- A power screw driver is recommended but not necessary.
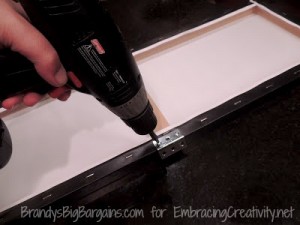
She recommends using flat screws so that when you go to close the frame shut the screws won’t hit each other. This is important so the frame goes flush against the wall.
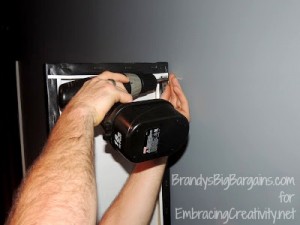
Once you’ve decided on a location for your frame you’ll want to pre-drill the holes in your walls and hammer in the anchors for added support (unless you happen to find a stud in the wall then you can forgo the anchors).
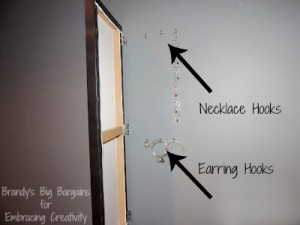
Once it’s attached to the wall you have the fun part! You can add hooks anywhere you see fit to your wall as long as they are well within the open area behind the frame. Brandy recommends using a pencil to lightly trace around the area of the frame and then stay two inches inside that pencil mark. You can hand all earrings together and all necklaces together or if you want to get really creative you could hang sets of jewelry together. The possibilities are endless!
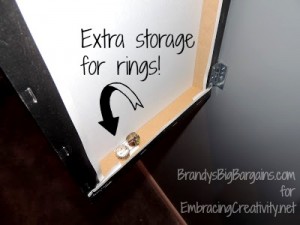
You could have hooks for rings or you could store your rings inside the “lip” of the frame. If your frame doesn’t have a lip there you could also tap a few skinny nails or tacks into the wood there to help hold your rings in place.
I think this is a fabulous way to store your jewelry all in one place and without it being an easy target to intruders. If you have too much jewelry to hide behind one frame you could consider adding a second or even a third frame to secretly store all of your beautiful belongings.
Thanks, Brandy for allowing us to share your pictures and fabulous idea!



Recent Comments