Embracing Creativity

Just another WordPress site

  • Crafts & DIY
  • Decorate
  • Food
  • Gifts
  • Holidays
  • Parties
  • Printables
  • Home
  • Contributors
  • Submit

Winnie the Pooh Baby Shower #DisneySide

March 12, 2014 83 Comments

Winnie the Pooh Party Cake

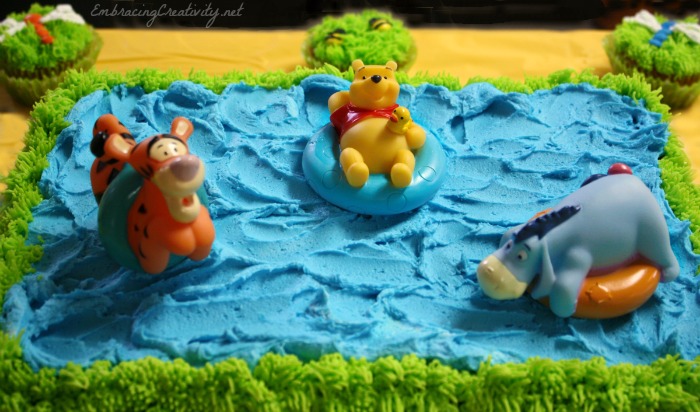
Isn’t this Winnie the Pooh cake just adorable!  It was made for my sweet friend’s Winnie the Pooh baby shower.  I’m here to share all the wonderful Winnie the Pooh party details with you here in collaboration with Disney. {They gave me a few goodies and party supplies.}  If you want to replicate this cake to show off your #DisneySide you can find the cake decorations/bath toys at Babies R Us.

Ladybug Cupcakes

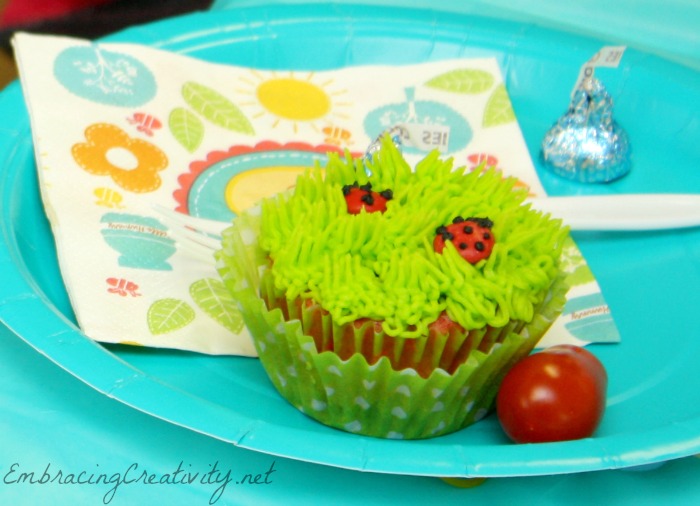
Here is a fun grass covered cupcake with two friendly ladybugs.

Winnie the Pooh Party - Rabbit's Garden

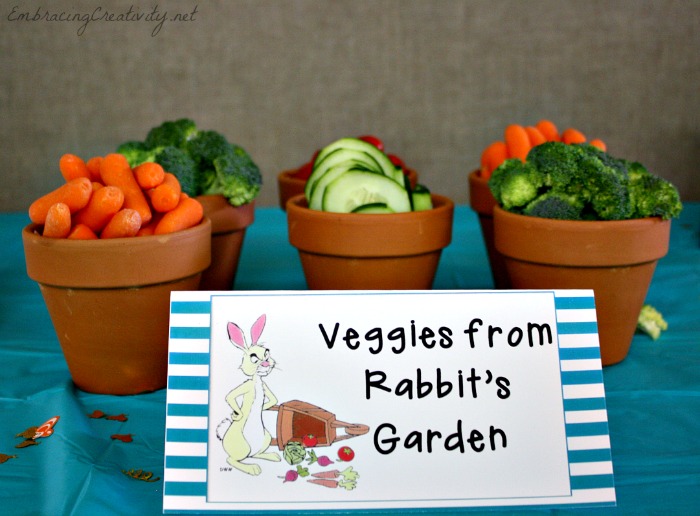
I absolutely fell in love with this idea and I think everyone enjoyed munching on veggies from Rabbit’s garden.

Winnie the Pooh Party - Kanga's Pouch

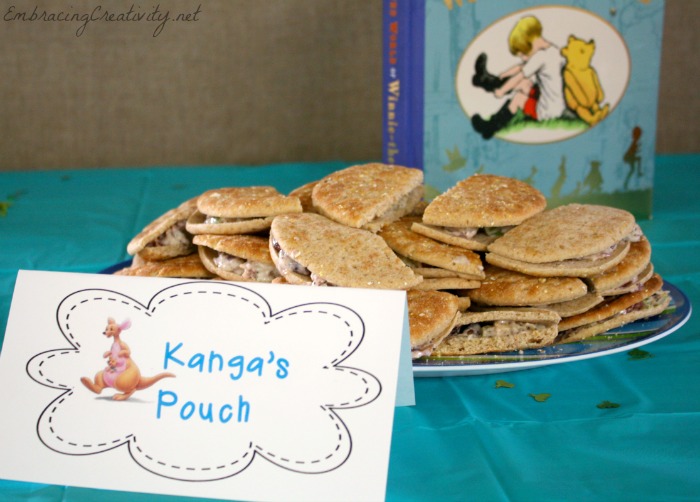
Kanga’s Pouches provided a nice snack.  You’ll notice there were Pooh books placed randomly throughout the party to add to the decor.

Winnie the Pooh - Tigger Tails

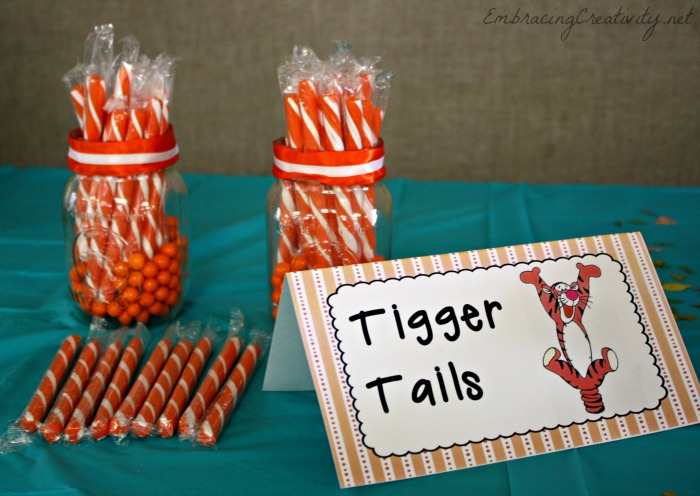
Tigger Tails not only made for a colorful display but also a nice take home treat.

Winnie the Pooh Party - Hugs and Kisses for Eeyore

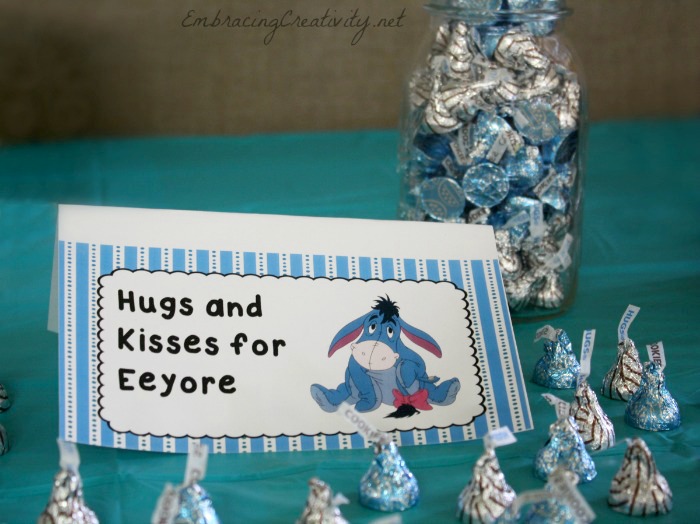
Hugs and Kisses for Eeyore.  Who couldn’t use more hugs?

Winnie the Pooh Party - Piglet's Punch

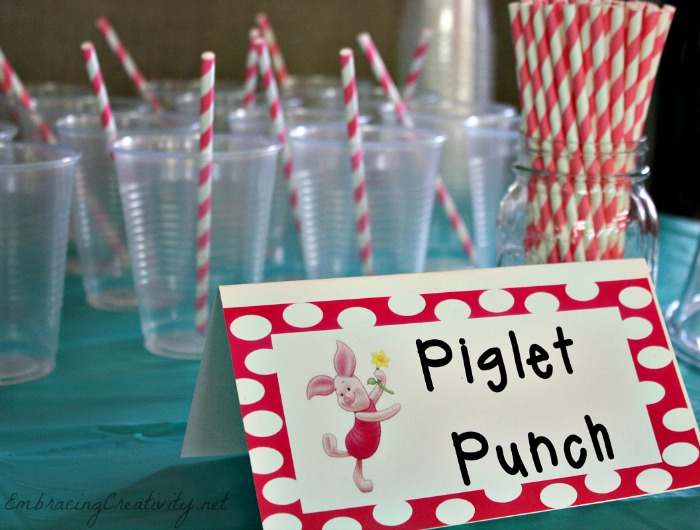
Piglet Punch was a simple pink punch with striped paper straws added for fun.

Think, Think, Think Framed Print

DIY Pooh Party decor right here!  Print, cut to size, and frame.  There were also pages from Winnie the Pooh books that were framed and on display also but I didn’t manage to get a shot of those.

Winnie the Pooh Diaper Bike

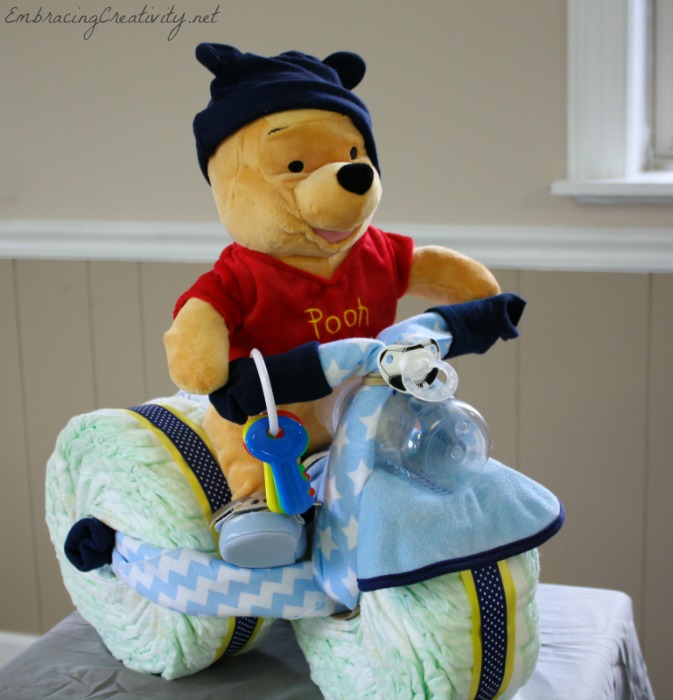
Check out this super cute Winnie the Pooh diaper motorcycle!  A friend of mine made this for the shower and I am in awe at her creativity.  I’ve made diaper cakes before but this stepped it up a notch.

Winnie the Pooh Party Decorations

Here is the gift table with a rusty red wagon and Pooh on board.  The honey pot window decor was a store bought decoration.  Oh, there is a picture of a framed Winnie the Pooh page!!

Winnie the Pooh Party

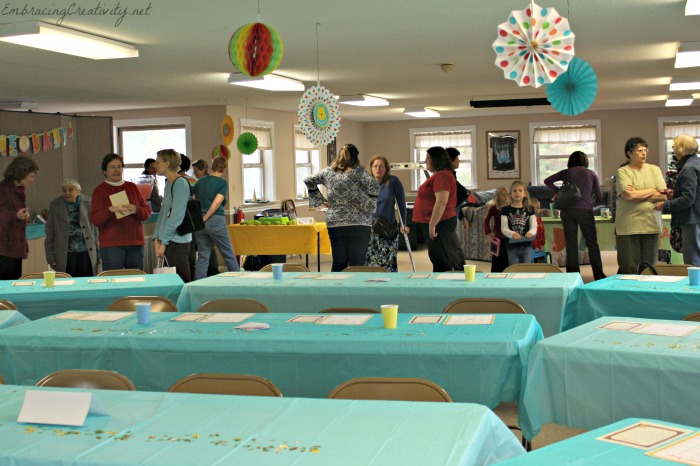
On the tables there was Winnie the Pooh themed confetti {I almost wrote “Pooh confetti” but that just doesn’t sound right!}, Winnie the Pooh bingo cards, and thank you note envelopes for the guests to write their address on.

I think the party was a huge success.  The decorations were full of cute but low on cost, the mama-to-be was blessed with an abundance of baby gifts, and there were even a few tears of happiness shed.  This is how my friends and I showed a little of our #DisneySide!  I hope enjoyed the party overview and feel inspired to show your #DisneySide to others.

{Also see: Minnie Mouse Birthday Party}

Filed Under: Parties Tagged With: Baby Showers, Disney, Parties, Winnie the Pooh

How to Create a Transparent Watermark in PicMonkey

March 6, 2014 123 Comments

How to Create a Transparent Watermark

Watermarking your photos is your first defense against photo theft.  This is a simple tutorial to teach you how to make a transparent watermark that you can simply paste on top of your photos.  Let’s get started, shall we?  To begin go to PicMonkey.com.

1.) Create a Collage

Watermark Tutorial

Open the Collage feature (if it prompts you to add photos just choose the sample photos they provide).  Then click the “X”  in the top right hand corner of 2 boxes.  You should be left with one large white box.  Don’t worry about the size of it at this point.

2.) Save a Transparent File

How to make a transparent logo

Click the Background tab and the check the box beside “Transparent background.”  Don’t worry, your image is still there.  It’s just invisible now.  

Save your image using the “Save” at the top of the page, name your background image, then save it as a .png file.  This is important, it has to be a .png file.  You can now close the Collage editor by clicking on the “X” in the upper right hand corner of the page.

3.) Create a Logo

Creating a transparent watermark

Use the Editor feature to open your transparent background file.  Those boxes won’t be in your image; they’re just there to let you know the dimensions of your transparent image.

Click on the Text tab and add the text you want on your logo.  Experiment with fonts to find one that’s easy to read and that best represents your brand.  You can also change the color at this point but it’s common to use either black or white.  Pick a font size that is fairly large, somewhere around 80-100 point should be good.  You can always resize it smaller when you add it on top of your image but making it bigger would make it look grainy.

If you’d like to add an image with your name you can browse PicMonkey’s collection of overlays.  For this tutorial I chose to add a black button and then rotated it slightly.

4.) Crop Your Logo

Transparent Watermark Tutorial

Once you’re happy with the way it looks go to the Basics tab and crop it tightly around your image.

5.) Save Your Transparent Watermark

How to make a reusable watermark

Go now and save it to your computer as a .png file.  It needs to be a .png file to be transparent so double check and make sure you’ve selected the right option.

That’s it!  Now you can have a professional consistent look on all of your images.  Don’t you feel savvy?

**Updated!**  To add it to your image follow these steps:

– Go to the “Overlays” tab.

– Choose “Your Own” option at the top.

– Select your transparent .png file from wherever you saved it.  Voila!

If you found this post helpful please pin it so others can find it!

Filed Under: Crafts & DIY Tagged With: Blogging, Photography, PicMonkey

King Cake History and Recipe

February 26, 2014 37 Comments

King Cake History and Recipe!

Friends of ours brought us this King Cake {also sometimes referred to as a King’s Cake, Kings’ Cake, or Three Kings’ Cake} along with some delicious chicken pie to help us out while we’re surviving our first few weeks with a newborn.  {If you want to see my super cute son you can here.  I think he’s adorable!  I know I’m biased but that’s allowed, right?}  This yummy treat started a discussion today with my blogging friends who had never heard of King Cake or the history behind it.  In case some of you are unfamiliar with the story I want to tell you about it.  Well, not in my words exactly but the following is from the info sheet our friends gave us with the King Cake.  {I’m not sure who’s the author of this info so if you know please share it with me.}

One of the many attractive customs surrounding the Christmas Season is the King’s Cake.  It has grown in popularity along with Christmas Carols, Christmas Trees, and Lights.  While these decorations are meant to be seen and admired, the Cake is a gift to be shared by family and friends at mealtime or during a party on or after “Little Christmas,” an expression used for the feast of Epiphany, observed for centuries on January 6.

In the Middle Ages, popular devotion during Christmastide turned to the Magi or Wise Men or Kings who had followed a star and paid homage to the baby Jesus.  By the twelfth century, veneration of the Magi or Kings themselves spread all over Europe.  In time, Epiphany (from the Greek work meaning ‘manifestation’ in most countries, became the feast of The Holy Kings.  The Gospel writers (Matthew, Mark, Luke, & John) do not mention the number of the Magi.  In the western church a slowly spreading legend put their number at three.  Perhaps this limitation was based on the three gifts mentioned in the Gospels: gold, frankincense, and myrrh.  Another reason may have been the early concept that the Magi represented all humanity in its three main races.  All through the Middle Ages Epiphany was the final day of the Christmas celebration.  It came to be known as the “Twelfth Night.”  Pageants included men riding horseback representing the Three Kings, crowned and richly clad, bearing cups filled with myrrh, incense, and the precious metal gold.  They rode through the streets of a city to the main church or cathedral where they offered their gifts.

In Hispanic, Italian, and other Mediterranean countries, January 6 is the day for giving presents to children.  In Rome, the “Lady Befana” (derived from the word Epiphany) distributes gifts among the little ones.  In Spain and South America gift giving is done not only at Christmas but also by the Magi.  During the night of January 6, small presents are placed in the children’s shoes by the Three Wise Men.

Connected with all of these customs is the King’s Cake.  Baked on the eve of January 6, it is prepared in honor of the Magi.  For long it was eaten on the afternoon of the Epiphany in connection with either the main meal or party for family, friends, and neighbors.

A feature of the King’s Cake is placing a coin in the dough before baking.  The person who has the piece with the coin is declared “king.”  More recently, the cake sometimes has had in it both a bean and a pea, making the respective finders “king” and “queen” of the party.  It is not unusual for bakers to put a plastic infant instead of a bean, pea, or even a pecan.

In medieval France, the coin finder was expected to make a donation to a worthy cause, usually the education of a youngster who otherwise might have been deprived of schooling.

In the New Orleans area, the King’s Cake is prepared and eaten during the Epiphany season, which according to liturgy of former times, extended from January 6 to the third Sunday before Mardi Gras or, more accurately, Ash Wednesday.  Nowadays, with the season of Epiphany no longer observed (although the feast is still prominent on the church calendar), the King’s Cakes are nevertheless prepared and consumed all the way to Mardi Gras.

And who knows but that Mardi Gras is nothing else but a throw back to the Epiphany pageantry of the medieval times, besides being a last “fling” before the penitential season of Lent and the King’s Cake as a delicacy, is an appetizing introduction to the carnival activities!

Isn’t that interesting?  It wasn’t until my husband and I met {around the time of Epiphany} that I learned about all of this.  Mike is great at trivia, he’s always teaching me something new!

This King’s Cake was made with individual cinnamon rolls instead of one large circle like the traditional cake.  Fun fact: “The cakes were made circular to portray the circular route used by the kings to get to the Christ Child, which was taken to confuse King Herod who was trying to follow the wise men so he could kill the Christ Child” {according to KingCake.com}.

For a great recipe try Emeril’s King Cake recipe.  If this is the first time you’ve made a King’s Cake I’ll warn you that, from my experience, they’re a bit dry if you don’t include a filling.  Still yummy but a little dry.  You could fill them with cream, fruit, or a combination of both.

Has your family ever celebrated with a King’s Cake?


Filed Under: Food, Holidays, Parties Tagged With: Cakes, Holidays, Mardi Gras, Parties

Free Valentine’s Day Party Printables

January 11, 2014 3 Comments

Free Valentine's Day Party Printables

Our Free Valentine’s Day Party Printables Essentials Kit includes 7 different types of products in one perfectly coordinating set!  You can print them all or pick and choose the ones you’d like.  Ready to get started?  Okay, just click on the links below to download the associated party printable in high-resolution format.

a) Mini Invitations
Coming in at 3.5” x 5” these sweet mini invitations are sure to delight their recipients.

b) XOXO Banner
Print as many panels as you need then add a hole and your favorite ribbon, twine, or string.  Now you’re ready to party!

c) Welcome Sign
Party welcome signs are one of my absolute favorite way to dress up a party – they are just so cute and simple! I’ve tried to make this printable a standard picture size {8×10} so framing this will be a breeze for you.

d) Party Circles
These little 2″ circles can serve many decorative purposes, but are definitely best known for their role as a cupcake topper. I love to see these made into circle garland but you could also use them as table confetti or craft them into a decorative napkin ring.

e) Decorative Wraps
Most often used as water bottle wraps, napkin rings {or both!} these multi-purpose decorative wraps are a great way to extend your theme to your most basic party supplies.

f) Bag Toppers
A great way to dress up sweet send-offs, these cute little bag toppers feature a double heart design and the phrase, “A Sweet Treat for My Valentine.”  These are perfectly sized at 4×6 and once folded they are 4×3.  You can attach to the top of a cello bag with a stapler or use glue dots for a more seamless look.

g) Food Tents
Food tents are the a perfect addition to your table decor.  These versatile tents are not only cute but very handy.  Simply write on them and place them wherever you want to label drinks or snacks.  They measure 4×6 and once folded they are 4×3.

I hope you’ll enjoy these fun Valentine freebies as much as I do!  If you do use them for a party of your own be sure to come back and share a link to your album or blog in the comment section.  I’d love to see your party!

Happy Valentine’s Day!

{I think it goes without saying but just in case: These are for personal or non profit use only.  Neither printables or printed products may be sold.}

Filed Under: Holidays, Parties, Printables Tagged With: Freebies, Party Printables, Printables, Valentine's Day

10 Things I love About You – Free Valentine Printable

January 6, 2014 11 Comments

10 Things I Love About You - Free Printable!

This Valentine printable is unlike the other ones we’ve shared so far and I think it’s a good kind of different.  The others were simple and cutesy printables that you, well, print and leave for your Valentine to find.  This one requires that you stop for a few minutes and write out ten things you love about the person you’re giving the note to.

Because my personality tends to procrastinate in hopes of achieving perfection, I want to encourage you to print this off and fill it out right now.  Right now.  If you save it for another day that day may never come.  Don’t try to think of something fancy or eloquent to say.  There’s no need to Google poetry verses.  Simply share from your heart.

{However, if you want to use this printable for your Valentine and insist on waiting to do it later, pin it on Pinterest so you don’t forget about it!}

Go here to get your free 10 Things I Love About You printable.

Words are powerful! I have no doubt that the few minutes you spend writing out your thoughts will be time well spent.  Be intentional and tell the people you care about why you love them!

By the way, I love you guys for coming by my blog and letting me share a little of my life with you.  I value your kind comments and emails more than you know.  Happy Valentine’s Day!

Filed Under: Gifts, Holidays, Printables Tagged With: Freebies, Printables, Valentine's Day

Key to my Heart – Free Valentine Printable

January 6, 2014 3 Comments

Key to my Heart - Free Printable!Who holds the key to your heart?  Why not let them know with this free printable?  This can be printed, cut out, and used as a tag on a gift, it can be left as a little love note for your sweetheart to find, or my favorite way, you could tie it onto your love’s key ring for a thoughtful surprise in the morning. Not to mention all the cute ways you could use this to give a gift to a child or to an adult from a child. {Please note that the EmbracingCreativity.net watermark won’t appear on the printed copy.}

I’m planning on doing 14 Days of Valentine’s for my husband this year. On Valentine’s Day this year we’ll both be sleep deprived from our newborn, who should be due shortly before, and I figured that small gestures and reminders of my affection will mean more to him than a store bought gift would. Plus, it will fit in our budget much better. Because I have to plan my 14 days out well in advance I figured I should share them with you in case you wanted to steal an idea here or there. I hope you enjoy these free Valentine printables and that you have a marvelous Valentine’s Day!

Go here to get the free Key to My Heart Download.

Filed Under: Crafts & DIY, Holidays, Printables Tagged With: Freebies, Printables, Valentine's Day

Love and Hearts – Free Valentine Printable

January 6, 2014 10 Comments

Love and Hearts - Free Valentine Printable!

This colorful design can be printed on a full sheet of printer paper to be framed or you could also print a smaller version on half a sheet of paper and use it for an inexpensive but adorable Valentine’s Day card.  You can get your Free Valentine Download here.  Enjoy!

Filed Under: Holidays, Printables Tagged With: Freebies, Printables, Valentine's Day

Free Printable Christmas Tree Cupcake Toppers!

December 5, 2013 3 Comments

I am bursting with Christmas spirit these days…seriously bursting, ya’ll!  To help make your home, or at least make your baked goods a little more festive, I have a free Christmas printable for you!  Yay!
Christmas Tree Cupcake Toppers

These cute and festive Christmas trees can be printed at home or your local office supply store.  Feel free to make as many copies as you like…just don’t try to sell them please!

For best results, print on heavy white card stock.  You can use a 2” circle hole punch to punch out the design or you can use good old fashioned scissors that work just as well.

To put the cupcake toppers on your cupcakes {or cakes, or brownies, etc} you will need toothpicks, lollipop sticks, or popsicle sticks and a little glue or tape.  Once the glue dries just pop them into your favorite dessert for quick Christmas flair!

These also make lovely party favor tags or Christmas present name tags.  To use these as tags for presents simply poke a little hole in the top, slide some string or ribbon through, and add your To:’s and From:’s on the back.  Easy peasy and cute!

Last but not least, these trees would make an adorable banner to add to your Christmas decor.  Simply glue or tape a long piece of string or ribbon to the back of them and hang on your mantle, or wreath, or Christmas tree.  The possibilities are really endless.

Go here to get your Free Printable Christmas Tree Cupcake Toppers!

If you enjoy this freebie please comment to let me know or pin it on Pinterest to share it with others.  Merry Christmas!!

Filed Under: Crafts & DIY, Holidays, Parties, Printables Tagged With: Christmas, Cupcake Toppers, Cupcakes, Freebies, Printables

Baby Shower Cake for Girls or Boys

November 15, 2013 13 Comments

Baby Shower Cake for Girls or Boys

This is a baby shower cake I made to celebrate my friend’s new bundle of joy.  I think this cake is perfect for a either a boy or a girl {just leave out the pink hair bow if it’s for a boy}.

This is a white cake with lemon curd filling, topped with butter cream, and then covered with fondant.  Everything is edible.  The spilled shampoo bottle was made from piping gel and the bubbles were made sparkly with edible shimmer powder.

If you have any questions feel free to ask!

Filed Under: Food, Parties Tagged With: Baby Shower, Cakes, Fondant, Food

8 Elegant No-Cut Pumpkin Decorations

October 9, 2013 2 Comments

8 Elegant No-Cut Pumpkins! Adorable!

Here are 8 Elegant No-Cut Pumpkin decorations that I’m excited to share!  Pumpkins are one of the things I love most about fall.  Here are the tutorials in order from the top right, clockwise, to the big picture in the middle.

Happy crafting!

  • – 1.  This monogram pumpkin tutorial is from RadioButlers.  I love that this design doesn’t involve an expensive Cricut or Silhouette machine to make.
  • – 2.  Martha Stewart is someone we can always turn to for a holiday craft and she doesn’t disappoint with her pumpkin vase with flowers tutorial.  Absolutely lovely!
  • – 3.  This decoupaged pumpkin from svgcuts is so sweet and looks very simple to create.
  • – 4.  The glitter candle holder from Twig & Thistle is just darling.  It does involve a little cutting but it’s very little and on a styrofoam pumpkin.
  • – 5.  Confessions of a Plate Addict has a different take on decoupaged pumpkins and I love it!
  • – 6.  Shanty 2 Chic shows us how to create a lovely pumpkin centerpiece using white pumpkins and pine cones.
  • – 7.  Life on Lakeshore Drive demonstrates how to create an elegant pumpkin using leftover scrapbook supplies.  Genius!
  • – 8.  Last but not least, Eddie Ross shows us how to make an attractive mantle display using pumpkins, paint, and rick rack.

I hope you feel invigorated and ready to start decorating pumpkins.  I know I sure do!!

Filed Under: Crafts & DIY, Decorate, Holidays Tagged With: Halloween, Pumpkins

« Previous Page
Next Page »

Welcome!

This is a brand new site that has branched off from EmbracingBeauty.com. We're still getting things settled around here so please pardon the dust. Feel free to browse through the other new sites via the images at the top of this page. Thanks for stopping by. We're glad to have you here!

Popular Posts

Ombre Rose Cake   Baby Shower Cake   Dollar Bill Flower Bouquet  

Recent Comments

  • Rena on DIY Paint Decorated Starbucks Bottles
  • dating on 5 Minute Tortelloni Dinner
  • Ashley on DIY Paint Decorated Starbucks Bottles
  • Ashley on How to Create a Transparent Watermark in PicMonkey
  • Ashley on How to Create a Transparent Watermark in PicMonkey
100 Days Shirt

100 Days of School Shirt Idea

ReUse, ReDesign, ReStore

© 2013–2025 Embracing Creativity. All rights reserved. Design by Marisa @ Soli Creative.