DIY Chandelier Planter

Chandelier Planter

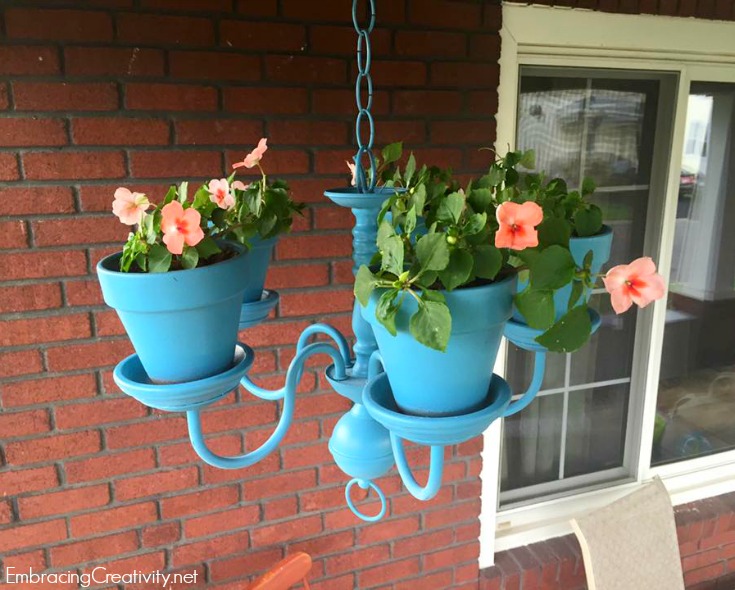
A college friend of mine, Megan, showed me this chandelier planter that she created and I absolutely loved it.  She gave me permission to share her work of art with you and was kind enough to write out how she did it.  I’ll turn it over to her now.

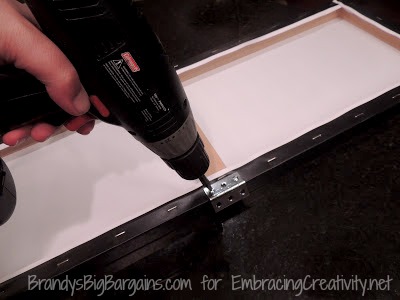
I used an old brass chandelier that was laying around our basement.  I had my husband remove the electrical wiring and elements.  Then I glued a terra cotta saucer and pot to each other, and on each of the chandelier’s arms. I used Elmer’s Pro-Bond Advanced Glue. It’s supposed to work on any material, and it worked for my terra-cotta to metal combo!  I hung the chandelier when dry and painted with a paint/primer combo (Valspar Tropical Oasis). I finished mine with a clear enamel spray paint because I had some left over from another project, but I think a specific sealant spray would have been better. Super easy! I only had to pay for the pots, which are pretty cheap at Lowe’s, and a can of spray paint!

There you have it folks!  An easy, cost-effective way to add a little DIY charm to your home.

If you have a creative party, recipe, or DIY and would like to be featured on Embracing Creativity we would love to see it!  You can submit your creativeness here.

Patriotic Clothespin Wreath

Clothes pin patriotic wreath

This Independence Day, Jill Bauer, QVC’s Home-Savvy Hostess, has the perfect patriotic décor tips to help celebrate America in style and she’s allowed me to share her easy peasy tutorial with you all.  I don’t know about you but I can’t wait to make this craft!  I think it will be one that my little girl will like to help me out with!

To make this Red, White and Blue Patriotic Clothespin Wreath, you’ll need:

  • – 12” wire wreath
  • – Red, white, and blue spray paint
  • – Clothespins
  • – Cardstock
  • – Starpunch (I might use foam stars with my daughter)
  • – Hot glue gun

To assemble:

  1. Spray paint the wire wreath white to hide the metal frame.
  2. On old newspapers or a drop cloth, line up all of the clothespins. Spray paint them red, white, and blue. (I did an equal amount in each color.) Let them dry for 1 hour.
  3. Meanwhile, punch several stars out of the card stock. If you didn’t use white card stock, just spray paint the stars white and let them dry.
  4. Clip the clothespins onto the wire wreath, alternating them between the second and third rings. (I started with the red clothes pins, then did the white, and finished with the blue.)
  5. Hot glue the stars over the blue clothespins.

Patriotic Mason Jar

To see more crafty goodness visit Jill on QVC.

Here’s another easy patriotic wreath:

Patriotic WreathPatriotic Wreath

Frozen Olaf Pumpkin

Frozen Olaf Pumpkin

By now, you’ve already been bombarded with 5 dozen sweet Elsa’s knocking on your door to say trick-or-treat, you’ve already handed out all of your candy, and you may have even put away all of your Halloween decor.  I know, I know, it’s a little late to be posting about a pumpkin but this Olaf inspired pumpkin was too cute not to show you.  Isn’t it darling?  A friend of mine made this Olaf pumpkin with her sweet daughter and gave me permission to share it.  I just love it!

Fall Tulle Wreath

Fall Tulle Wreath

This lovely wreath was made quickly using tulle and a metal wreath frame.  Simply curl the tulle and tie small sections around the metal frame.  Repeat until you get the thickness you’d like.  This wreath was completed by tying a cheap “Welcome” sign to the front of the wreath.  Voila!  This inexpensive wreath is adorable and can be made while watching TV one evening.

If you like this wreath please pin it so you can find it later and check out our Pumpkin Tulle Wreath too.

Pumpkin Tulle Wreath

Pumpkin Tulle Wreath

This beautiful and inexpensive wreath was made using leftover tulle from a local girl scout parade float.  It’s never too early to teach kids about recycling and repurposing.  Look what beautiful decor was made from what would have otherwise been trash.  My daughter knows that any left over plastic container will be reused in our house.  They’re mainly used to store loose craft odds and ends but that’s another story.

Take a styrofoam wreath and wrap the tulle around, securing it with straight pins.  Add a little brown and green tulle for leaves and a stem.  Tie a burlap ribbon, add a little raffia, and voila!  You’re finished before you know it.

I hope you enjoy this pumpkin wreath craft as much as I did!

DIY Monogram Wall Art

DIY Monogram Wall Art!

This simple DIY is all about making something individualized and colorful for your home. Using glass pebbles a wooden letter, and a few things you probably having lying around your house, we’re going to create a stylish initial to liven up any bare wall.

Okay, so here we go. All you need is the letter of your choice, glue (a hot glue gun worked great, available at any craft store), a wooden frame (it’s optional but this one came from Dahlia’s Flowers) and glass pebbles (or gems, marbles, fish tank decorations. You know what I’m talking about, right?).  Keep in mind the color of your letter when choosing the color of your pebbles.  Since they are slightly see through your background color will make a difference.

Instructions:

  1. Buy supplies.
  2. Arrange pebbles on your letter to suit your taste. Remove row of pebbles from your letter and glue them back into place one or two at a time. Continue to fill in the entire letter, section by section, until complete.
  3. Allow a few minutes for the last pebbles to dry before hanging.
  4. If you want to hang a bare frame around your letter you would do that now otherwise you’re finished.  Yay!
  5. Stand back and admire your creative and inexpensive piece of art!

This DIY Monogram wall art would make a great baby gift for new parents.

DIY Letter Art

Just look how cute it is above the crib in my friend’s nursery!

Simple DIY Wall Art

If you found this helpful, pin it so you can share it with others and access it later!

Thank you, Stephanie for sharing your simple DIY monogram art!  If YOU have a project you would like featured you can submit it here.

8 Elegant No-Cut Pumpkin Decorations

8 Elegant No-Cut Pumpkins! Adorable!

Here are 8 Elegant No-Cut Pumpkin decorations that I’m excited to share!  Pumpkins are one of the things I love most about fall.  Here are the tutorials in order from the top right, clockwise, to the big picture in the middle.

Happy crafting!

  • – 1.  This monogram pumpkin tutorial is from RadioButlers.  I love that this design doesn’t involve an expensive Cricut or Silhouette machine to make.
  • – 2.  Martha Stewart is someone we can always turn to for a holiday craft and she doesn’t disappoint with her pumpkin vase with flowers tutorial.  Absolutely lovely!
  • – 3.  This decoupaged pumpkin from svgcuts is so sweet and looks very simple to create.
  • – 4.  The glitter candle holder from Twig & Thistle is just darling.  It does involve a little cutting but it’s very little and on a styrofoam pumpkin.
  • – 5.  Confessions of a Plate Addict has a different take on decoupaged pumpkins and I love it!
  • – 6.  Shanty 2 Chic shows us how to create a lovely pumpkin centerpiece using white pumpkins and pine cones.
  • – 7.  Life on Lakeshore Drive demonstrates how to create an elegant pumpkin using leftover scrapbook supplies.  Genius!
  • – 8.  Last but not least, Eddie Ross shows us how to make an attractive mantle display using pumpkins, paint, and rick rack.

I hope you feel invigorated and ready to start decorating pumpkins.  I know I sure do!!

DIY Paint Decorated Starbucks Bottles

Let’s see a raise of hands, who  in here has a love of Starbucks?  I thought so, I love it too.  For me, it’s only a treat for special occasions because my husband doesn’t like it, it’s costly, and it’s usually out of the way to get to one.  However, I get the Starbucks bottles at Walmart about once a month.  I’ll buy them if they have a coupon attached and I’m craving one or my husband will buy them for me when he knows I’ve had a hard week.  Isn’t he the sweetest?  I am very blessed to have him!  Long story short, I have a small collection of Starbucks bottles accumulating at my house.  After I collect 8 or so I force myself to put them in the recycling bin but it seems like such a shame wasting a perfectly good, beautifully shaped bottle.  I don’t know why but I’m pretty much in love with the shape and size of their bottles.  This brings me to why I’m writing here today, I’m going to show you how to repurpose old Starbucks bottles into a lovely home decor item.

DIY Paint Decorated Starbucks Bottles

Let’s begin, shall we?

Here are the materials you’ll want to have on hand before you begin:

  • -Starbucks bottles with the labels peeled off and washed clean.
  • -Spray primer {this is optional but recommended if the bottle will be handled much}
  • -Puffy paint {the color doesn’t matter}
  • -Spray paint in all of the shades and finishes you want to use.
  • -Sharpie

I’ve seen so many of these DIY bottle ideas on Pinterest but I while I love the idea I don’t like how the finished product looks.  I think it’s because hot glue guns are so hard to manipulate and get precisely where you want it.  One day it dawned on me, why not use a little bottle of paint?  A small bottle that could fit in your hand seemed genius to me!  My first trial run with this wasn’t a huge success because I bought a small squeeze bottle of paint but it wasn’t puffy paint and no matter how many coats I applied it still dried flat.  Make sure you buy puffy paint!

I primed the bottles with the spray paint and because I’m a mom I waited a few days before I could get back to it.  I believe that you should be fine to continue after a few hours but check the spray paint can just to be sure.

Next, I used a Sharpie to draw out the design I wanted.  I was careful to draw the letters far apart, taking into account the thickness of the paint.  Oh, I almost forgot!  It’s not a huge deal but it kind of bothers me…make sure you turn your bottles so that you aren’t writing where there numbers or dots on the lower portion of your bottle.  There are blank sides but for some reason this didn’t dawn on me until I was completely finished.

DIY Spray Painted Bottles

Then, I applied my Puffy Paint.  This is very easy to do!  I even did this while I was talking on the phone with my mom.  If you’ve never worked with Puffy Paint before, it’s simple to use.  It’s very similar to decorating a cake.  You bring the tip to the bottle, squeeze slightly, then lift the tip up as you continue with light pressure slowly guiding the bottle around.  You’ll want to use your arm to guide the bottle around and not your hand.  I don’t mean to complicate this step, it’s really simple!  Besides, if you mess up all you have to do it let it dry, peel it off, and start over.

Spray Painted Bottles

Now all that is left is the spray painting.  I chose Krylon spray paint because this brand had three colors that I thought would go well together but you can use any brand or color that you like.  I just applied one coat of each even though the can recommended two coats.  Although, I skipped this step, if your bottle is going to be regularly used you’ll probably want to give it a coat of polyurethane.

DIY Paint Decorated Starbucks Bottles

There you have it, folks!  Simple DIY Paint Decorated Bottles.  I hope you like this tutorial and if you did please pin it to help share it with others.

Make a Pretty Spring Wreath!

I’ll admit it: I’ve had coffee filter wreath-envy ever since a friend made one at Christmastime.  It was lacy-white, beautiful in its simplicity, and striking with a bright ribbon ready for the hanging.

I wanted one.  I needed one.  But Christmas came and went and oh!  I never made one.

But I couldn’t get it out of my mind.

I began dreaming of a coffee filter wreath fit for spring.  I wanted something softly variegated, like tea roses, something that would make my spring mantel pop and my front door say “Welcome.”

I wanted something like this:

DIY Coffee Filter Wreath

It’s breathtaking.

It’s inexpensive.

And, it’s a very simple project to undertake.  In fact, you can start today.

First, gather the following supplies:

*1 foam wreath form, 12”

*Extra yarn, ribbon, or fabric strips, enough to cover the wreath form, optional

*I package of white basket-style coffee filters (I used 3” filters)

*Hot glue gun and plenty of glue sticks

*Ribbon to finish

*Food coloring

*I cup strong black tea, cooled

Step 1—Wrap the Wreath Form

I like to wrap foam wreath forms in a coordinating ribbon, yarn, or fabric strips.  This is not completely necessary but it allows me to be a little less perfect in the placement of my coffee filter flowers because  it doesn’t matter if a little bit shows through between the flowers.

Also, I like my wreaths to be finished on all sides.  It gives a nice, professional appearance to the final product.

Step 2—Dye the Filters

Variegated Coffee Filter Wreath

Using food coloring, dye several bowls of water any shades you like.  Keep in mind that the colors will dry lighter, so don’t be afraid to make deep, concentrated hues.  I used red, purple, green, and blue.  I also brewed a cup of strong black tea because I wanted some of my filter flowers to resemble dried roses.  The flowers I double-dipped in tea ended up being my favorites.

Working in batches of 5-8 filters at a time, begin by folding the filters into half, and then half again so you’re working with a manageable quarter-circle.   Scallop the edges with a scissors so they will look like flower petals when you fold them.

Dip the wider end of the circle into the color of choice.  Take it out of the water and allow the color to seep to the middle.  Double dip, if desired, in another color until you get the look you want.  The filter will draw the colors into the middle, lightening as it goes.

Be sure to dye at least 100 filters.  You will need all of them for this project!

Step 3—Drying

To dry, spread the filters flat on a cookie sheet and place them in a warm oven.  There is no need to separate them.  Just keep them in the groups you dyed them in.  But be sure to turn off the oven once you put the filters in to prevent them from burning.  Rotate occasionally until dry.

If you have a food dehydrator, you can use it to dry the filters.  They dry very rapidly on the highest setting so check back often.

Step 4—Create Filter Flowers

Creating flowers out of the dyed filters is time consuming.  There’s no way around it.  So, plug in your glue gun, put on some great music, and plan to stay awhile.

You don’t really need directions from this point on, but if you’d like to know what I found to be the most effective technique for making filter flowers, read on. 

DIY Coffee Filter Flowers

Click on the photo for a close-up look.

Working in batches of 4-5 filters, fold the filters into fourths.  Cut circles out of the centers of the filters using a scalloped cut.  Unfold.  You should have two parts: a scalloped circle (the center of your flower) and a large, scalloped outer ring.

Take the center circle and put a dot of hot glue in the middle.  Pinch it together, bringing the scalloped edges up and rolling it slightly until it resembles the center of a flower.

Now, take the larger outer ring.  Make it into a flat figure 8, securing the inner edges with a dab of hot glue where they come together.  Place the flower center right onto the middle of the figure 8, glue and fold the edges up so they look like more petals.

You should have two loops on either side of the flower center.  Glue the middles of those two loops to the center flower.  You will have a few more smaller loops now.  Glue those to the center as well, always folding and gluing as necessary to create flowers.

Don’t worry if they’re not perfect.  Once you glue them onto the wreath, most of the imperfections won’t show anyway.

Set aside and repeat until you wonder what possessed you to do this project in the first place.

Coffee Filter Flowers

Step 5—Arrange the Flowers

I decided to group bunches of like-colored flowers in a pattern around my wreath, but a random pattern would be just as pretty.  Do what you like!

Save any “flower failures” to fill in the bare spots where no one will see.

Coffee Filter Wreaths

Step 6—Finish

Your choice of ribbon will determine the feel of your project.  A wide ribbon is elegant while a bright, thin ribbon is fun and festive.  Embrace your creativity until you find a look you love.

Then, enjoy your beautiful wreath all season long.

Coffee Filter Wreath Ideas


Turn a Canvas Print into a Hidden Jewelry Holder

Turn a Canvas Print Into a Hidden Jewelry Holder #DIY


I’m a paranoid person by nature so I know all of the tricks and secrets to truly hide jewelry, money, and other valuables from would-be thieves.  I know them, however, I don’t always follow them.  For instance, one of the big no-nos you shouldn’t do is to keep all of your valuables in one location.  Aka a jewelry box.  It’s so hard not to though, isn’t it?  You don’t want to go rummaging around in your sock drawer for your favorite necklace only to find that after pulling out every sock that it was in your faux John Grisham novel.


It’s convenient to store all of your jewelry in one well visible jewelry box but it’s not always the wisest idea.  My good friend who was recently robbed can attest to this.  Her house was broken into in a 30 minute window of time and all they grabbed was a laptop, DS, and, you guessed it, her jewelry box.


When Brandy from Brandy’s Big Bargains told me about how she was turning a cheap canvas print into a hidden jewelry holder I was interested.  While I would love a safe in the wall behind an elegant photo I’ve got to be realistic and know that that will never happen.  This DIY Canvas Hidden Jewelry Holder, now that I can do!


Here’s what you need:
  • She bought a $9.99 canvas from Home Goods but any canvas print with an open back will do!
  • 2 Hinges.
  • Screws and anchors (enough for your size hinges).
  • Hooks (as many as you’d like).
  • A power screw driver is recommended but not necessary.


Screwing a hinge on


She recommends using flat screws so that when you go to close the frame shut the screws won’t hit each other.  This is important so the frame goes flush against the wall.


Screwing the photo to the wall


Once you’ve decided on a location for your frame you’ll want to pre-drill the holes in your walls and hammer in the anchors for added support (unless you happen to find a stud in the wall then you can forgo the anchors).


Hidden Necklace and Earring Hooks


Once it’s attached to the wall you have the fun part!  You can add hooks anywhere you see fit to your wall as long as they are well within the open area behind the frame.  Brandy recommends using a pencil to lightly trace around the area of the frame and then stay two inches inside that pencil mark.  You can hand all earrings together and all necklaces together or if you want to get really creative you could hang sets of jewelry together.  The possibilities are endless!


Hidden Ring Storage


You could have hooks for rings or you could store your rings inside the “lip” of the frame.  If your frame doesn’t have a lip there you could also  tap a few skinny nails or tacks into the wood there to help hold your rings in place.


I think this is a fabulous way to store your jewelry all in one place and without it being an easy target to intruders.  If you have too much jewelry to hide behind one frame you could consider adding a second or even a third frame to secretly store all of your beautiful belongings.


Thanks, Brandy for allowing us to share your pictures and fabulous idea!