Fall Tulle Wreath

Fall Tulle Wreath

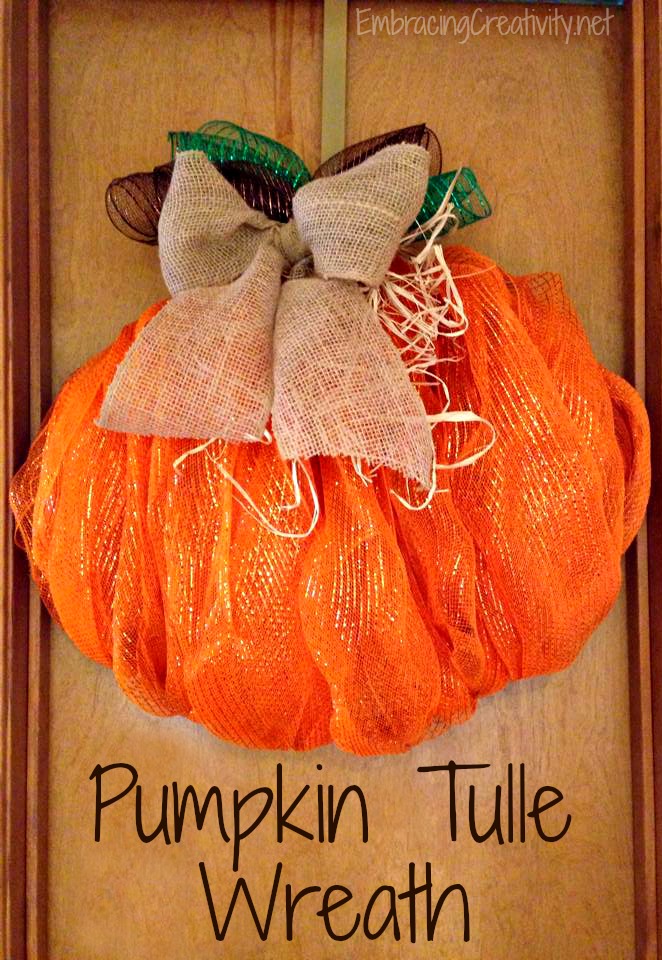
This lovely wreath was made quickly using tulle and a metal wreath frame.  Simply curl the tulle and tie small sections around the metal frame.  Repeat until you get the thickness you’d like.  This wreath was completed by tying a cheap “Welcome” sign to the front of the wreath.  Voila!  This inexpensive wreath is adorable and can be made while watching TV one evening.

If you like this wreath please pin it so you can find it later and check out our Pumpkin Tulle Wreath too.

Pumpkin Tulle Wreath

Pumpkin Tulle Wreath

This beautiful and inexpensive wreath was made using leftover tulle from a local girl scout parade float.  It’s never too early to teach kids about recycling and repurposing.  Look what beautiful decor was made from what would have otherwise been trash.  My daughter knows that any left over plastic container will be reused in our house.  They’re mainly used to store loose craft odds and ends but that’s another story.

Take a styrofoam wreath and wrap the tulle around, securing it with straight pins.  Add a little brown and green tulle for leaves and a stem.  Tie a burlap ribbon, add a little raffia, and voila!  You’re finished before you know it.

I hope you enjoy this pumpkin wreath craft as much as I did!

Watermelon Krispie Treats

Watermelon Krispie Treats

A friend of mine made these adorable Watermelon Krispie Treats for her family and was kind enough to share with us how she did it!  {She took the simple and quick method but if you want a longer method using Kool-Aid check out the watermelon treats from Dine and Dish.  They also have a cute hamburger made out of homemade Rice Krispie Treats!}

Instructions:

  • – Follow Kelloggs’ Rice Krispie Treat recipe except you’ll divide the marshmellow-y goodness in half and add green food coloring to one half and red to the other.
  • – Use a springform pan for easy release and a perfect shape.
  • – Once your watermelon is cooled you can add raisins or chocolate chips.

That’s it!  Just slice and serve.  One 9 inch pan should feed quite a few people.  Enjoy!!

Patriotic Wreath DIY

Patriotic Wreath

The combination of textures, patterns and patriotic color palette is perfection!  It i’s sure to give your guests a warm welcome.  The best thing about this patriotic wreath is that you can easily remove the additional decorations and keep your burlap base the same.

One wreath + endless seasonal decorations = less clutter and more cute!

The supplies needed to make this exact wreath above include strips of burlap (from any craft store, Walmart, or Amazon), a Styrofoam wreath form (available at same locations), red and blue piping (from Michael’s), paper stars (from Party City), floral pins, and a handy pair of scissors.

You can check out the basic burlap pinning technique here at Create Inspire.  Once the wreath is decorated in beautiful burlap the piping is woven in and out and pinned using floral pins.  The stars are also secured using pins.

Voila!!  That’s it!  This wreath can easily be done in twenty minutes and it will take even less time to change out the seasonal embellishments.

Thanks to my cousin, Nicole, for this simple tutorial!  

King Cake History and Recipe

King Cake History and Recipe!

Friends of ours brought us this King Cake {also sometimes referred to as a King’s Cake, Kings’ Cake, or Three Kings’ Cake} along with some delicious chicken pie to help us out while we’re surviving our first few weeks with a newborn.  {If you want to see my super cute son you can here.  I think he’s adorable!  I know I’m biased but that’s allowed, right?}  This yummy treat started a discussion today with my blogging friends who had never heard of King Cake or the history behind it.  In case some of you are unfamiliar with the story I want to tell you about it.  Well, not in my words exactly but the following is from the info sheet our friends gave us with the King Cake.  {I’m not sure who’s the author of this info so if you know please share it with me.}

One of the many attractive customs surrounding the Christmas Season is the King’s Cake.  It has grown in popularity along with Christmas Carols, Christmas Trees, and Lights.  While these decorations are meant to be seen and admired, the Cake is a gift to be shared by family and friends at mealtime or during a party on or after “Little Christmas,” an expression used for the feast of Epiphany, observed for centuries on January 6.

In the Middle Ages, popular devotion during Christmastide turned to the Magi or Wise Men or Kings who had followed a star and paid homage to the baby Jesus.  By the twelfth century, veneration of the Magi or Kings themselves spread all over Europe.  In time, Epiphany (from the Greek work meaning ‘manifestation’ in most countries, became the feast of The Holy Kings.  The Gospel writers (Matthew, Mark, Luke, & John) do not mention the number of the Magi.  In the western church a slowly spreading legend put their number at three.  Perhaps this limitation was based on the three gifts mentioned in the Gospels: gold, frankincense, and myrrh.  Another reason may have been the early concept that the Magi represented all humanity in its three main races.  All through the Middle Ages Epiphany was the final day of the Christmas celebration.  It came to be known as the “Twelfth Night.”  Pageants included men riding horseback representing the Three Kings, crowned and richly clad, bearing cups filled with myrrh, incense, and the precious metal gold.  They rode through the streets of a city to the main church or cathedral where they offered their gifts.

In Hispanic, Italian, and other Mediterranean countries, January 6 is the day for giving presents to children.  In Rome, the “Lady Befana” (derived from the word Epiphany) distributes gifts among the little ones.  In Spain and South America gift giving is done not only at Christmas but also by the Magi.  During the night of January 6, small presents are placed in the children’s shoes by the Three Wise Men.

Connected with all of these customs is the King’s Cake.  Baked on the eve of January 6, it is prepared in honor of the Magi.  For long it was eaten on the afternoon of the Epiphany in connection with either the main meal or party for family, friends, and neighbors.

A feature of the King’s Cake is placing a coin in the dough before baking.  The person who has the piece with the coin is declared “king.”  More recently, the cake sometimes has had in it both a bean and a pea, making the respective finders “king” and “queen” of the party.  It is not unusual for bakers to put a plastic infant instead of a bean, pea, or even a pecan.

In medieval France, the coin finder was expected to make a donation to a worthy cause, usually the education of a youngster who otherwise might have been deprived of schooling.

In the New Orleans area, the King’s Cake is prepared and eaten during the Epiphany season, which according to liturgy of former times, extended from January 6 to the third Sunday before Mardi Gras or, more accurately, Ash Wednesday.  Nowadays, with the season of Epiphany no longer observed (although the feast is still prominent on the church calendar), the King’s Cakes are nevertheless prepared and consumed all the way to Mardi Gras.

And who knows but that Mardi Gras is nothing else but a throw back to the Epiphany pageantry of the medieval times, besides being a last “fling” before the penitential season of Lent and the King’s Cake as a delicacy, is an appetizing introduction to the carnival activities!

Isn’t that interesting?  It wasn’t until my husband and I met {around the time of Epiphany} that I learned about all of this.  Mike is great at trivia, he’s always teaching me something new!

This King’s Cake was made with individual cinnamon rolls instead of one large circle like the traditional cake.  Fun fact: “The cakes were made circular to portray the circular route used by the kings to get to the Christ Child, which was taken to confuse King Herod who was trying to follow the wise men so he could kill the Christ Child” {according to KingCake.com}.

For a great recipe try Emeril’s King Cake recipe.  If this is the first time you’ve made a King’s Cake I’ll warn you that, from my experience, they’re a bit dry if you don’t include a filling.  Still yummy but a little dry.  You could fill them with cream, fruit, or a combination of both.

Has your family ever celebrated with a King’s Cake?


Free Valentine’s Day Party Printables

Free Valentine's Day Party Printables

Our Free Valentine’s Day Party Printables Essentials Kit includes 7 different types of products in one perfectly coordinating set!  You can print them all or pick and choose the ones you’d like.  Ready to get started?  Okay, just click on the links below to download the associated party printable in high-resolution format.

a) Mini Invitations
Coming in at 3.5” x 5” these sweet mini invitations are sure to delight their recipients.

b) XOXO Banner
Print as many panels as you need then add a hole and your favorite ribbon, twine, or string.  Now you’re ready to party!

c) Welcome Sign
Party welcome signs are one of my absolute favorite way to dress up a party – they are just so cute and simple! I’ve tried to make this printable a standard picture size {8×10} so framing this will be a breeze for you.

d) Party Circles
These little 2″ circles can serve many decorative purposes, but are definitely best known for their role as a cupcake topper. I love to see these made into circle garland but you could also use them as table confetti or craft them into a decorative napkin ring.

e) Decorative Wraps
Most often used as water bottle wraps, napkin rings {or both!} these multi-purpose decorative wraps are a great way to extend your theme to your most basic party supplies.

f) Bag Toppers
A great way to dress up sweet send-offs, these cute little bag toppers feature a double heart design and the phrase, “A Sweet Treat for My Valentine.”  These are perfectly sized at 4×6 and once folded they are 4×3.  You can attach to the top of a cello bag with a stapler or use glue dots for a more seamless look.

g) Food Tents
Food tents are the a perfect addition to your table decor.  These versatile tents are not only cute but very handy.  Simply write on them and place them wherever you want to label drinks or snacks.  They measure 4×6 and once folded they are 4×3.

I hope you’ll enjoy these fun Valentine freebies as much as I do!  If you do use them for a party of your own be sure to come back and share a link to your album or blog in the comment section.  I’d love to see your party!

Happy Valentine’s Day!

{I think it goes without saying but just in case: These are for personal or non profit use only.  Neither printables or printed products may be sold.}

10 Things I love About You – Free Valentine Printable

10 Things I Love About You - Free Printable!

This Valentine printable is unlike the other ones we’ve shared so far and I think it’s a good kind of different.  The others were simple and cutesy printables that you, well, print and leave for your Valentine to find.  This one requires that you stop for a few minutes and write out ten things you love about the person you’re giving the note to.

Because my personality tends to procrastinate in hopes of achieving perfection, I want to encourage you to print this off and fill it out right now.  Right now.  If you save it for another day that day may never come.  Don’t try to think of something fancy or eloquent to say.  There’s no need to Google poetry verses.  Simply share from your heart.

{However, if you want to use this printable for your Valentine and insist on waiting to do it later, pin it on Pinterest so you don’t forget about it!}

Go here to get your free 10 Things I Love About You printable.

Words are powerful! I have no doubt that the few minutes you spend writing out your thoughts will be time well spent.  Be intentional and tell the people you care about why you love them!

By the way, I love you guys for coming by my blog and letting me share a little of my life with you.  I value your kind comments and emails more than you know.  Happy Valentine’s Day!

Key to my Heart – Free Valentine Printable

Key to my Heart - Free Printable!Who holds the key to your heart?  Why not let them know with this free printable?  This can be printed, cut out, and used as a tag on a gift, it can be left as a little love note for your sweetheart to find, or my favorite way, you could tie it onto your love’s key ring for a thoughtful surprise in the morning. Not to mention all the cute ways you could use this to give a gift to a child or to an adult from a child. {Please note that the EmbracingCreativity.net watermark won’t appear on the printed copy.}

I’m planning on doing 14 Days of Valentine’s for my husband this year. On Valentine’s Day this year we’ll both be sleep deprived from our newborn, who should be due shortly before, and I figured that small gestures and reminders of my affection will mean more to him than a store bought gift would. Plus, it will fit in our budget much better. Because I have to plan my 14 days out well in advance I figured I should share them with you in case you wanted to steal an idea here or there. I hope you enjoy these free Valentine printables and that you have a marvelous Valentine’s Day!

Go here to get the free Key to My Heart Download.

Love and Hearts – Free Valentine Printable

Love and Hearts - Free Valentine Printable!

This colorful design can be printed on a full sheet of printer paper to be framed or you could also print a smaller version on half a sheet of paper and use it for an inexpensive but adorable Valentine’s Day card.  You can get your Free Valentine Download here.  Enjoy!

Free Printable Christmas Tree Cupcake Toppers!

I am bursting with Christmas spirit these days…seriously bursting, ya’ll!  To help make your home, or at least make your baked goods a little more festive, I have a free Christmas printable for you!  Yay!
Christmas Tree Cupcake Toppers

These cute and festive Christmas trees can be printed at home or your local office supply store.  Feel free to make as many copies as you like…just don’t try to sell them please!

For best results, print on heavy white card stock.  You can use a 2” circle hole punch to punch out the design or you can use good old fashioned scissors that work just as well.

To put the cupcake toppers on your cupcakes {or cakes, or brownies, etc} you will need toothpicks, lollipop sticks, or popsicle sticks and a little glue or tape.  Once the glue dries just pop them into your favorite dessert for quick Christmas flair!

These also make lovely party favor tags or Christmas present name tags.  To use these as tags for presents simply poke a little hole in the top, slide some string or ribbon through, and add your To:’s and From:’s on the back.  Easy peasy and cute!

Last but not least, these trees would make an adorable banner to add to your Christmas decor.  Simply glue or tape a long piece of string or ribbon to the back of them and hang on your mantle, or wreath, or Christmas tree.  The possibilities are really endless.

Go here to get your Free Printable Christmas Tree Cupcake Toppers!

If you enjoy this freebie please comment to let me know or pin it on Pinterest to share it with others.  Merry Christmas!!