Free Printable Christmas Tree Cupcake Toppers!

I am bursting with Christmas spirit these days…seriously bursting, ya’ll!  To help make your home, or at least make your baked goods a little more festive, I have a free Christmas printable for you!  Yay!
Christmas Tree Cupcake Toppers

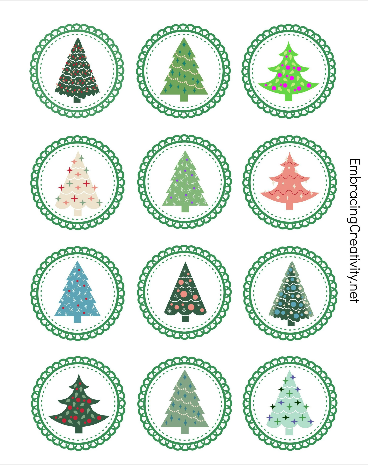
These cute and festive Christmas trees can be printed at home or your local office supply store.  Feel free to make as many copies as you like…just don’t try to sell them please!

For best results, print on heavy white card stock.  You can use a 2” circle hole punch to punch out the design or you can use good old fashioned scissors that work just as well.

To put the cupcake toppers on your cupcakes {or cakes, or brownies, etc} you will need toothpicks, lollipop sticks, or popsicle sticks and a little glue or tape.  Once the glue dries just pop them into your favorite dessert for quick Christmas flair!

These also make lovely party favor tags or Christmas present name tags.  To use these as tags for presents simply poke a little hole in the top, slide some string or ribbon through, and add your To:’s and From:’s on the back.  Easy peasy and cute!

Last but not least, these trees would make an adorable banner to add to your Christmas decor.  Simply glue or tape a long piece of string or ribbon to the back of them and hang on your mantle, or wreath, or Christmas tree.  The possibilities are really endless.

Go here to get your Free Printable Christmas Tree Cupcake Toppers!

If you enjoy this freebie please comment to let me know or pin it on Pinterest to share it with others.  Merry Christmas!!

8 Elegant No-Cut Pumpkin Decorations

8 Elegant No-Cut Pumpkins! Adorable!

Here are 8 Elegant No-Cut Pumpkin decorations that I’m excited to share!  Pumpkins are one of the things I love most about fall.  Here are the tutorials in order from the top right, clockwise, to the big picture in the middle.

Happy crafting!

  • – 1.  This monogram pumpkin tutorial is from RadioButlers.  I love that this design doesn’t involve an expensive Cricut or Silhouette machine to make.
  • – 2.  Martha Stewart is someone we can always turn to for a holiday craft and she doesn’t disappoint with her pumpkin vase with flowers tutorial.  Absolutely lovely!
  • – 3.  This decoupaged pumpkin from svgcuts is so sweet and looks very simple to create.
  • – 4.  The glitter candle holder from Twig & Thistle is just darling.  It does involve a little cutting but it’s very little and on a styrofoam pumpkin.
  • – 5.  Confessions of a Plate Addict has a different take on decoupaged pumpkins and I love it!
  • – 6.  Shanty 2 Chic shows us how to create a lovely pumpkin centerpiece using white pumpkins and pine cones.
  • – 7.  Life on Lakeshore Drive demonstrates how to create an elegant pumpkin using leftover scrapbook supplies.  Genius!
  • – 8.  Last but not least, Eddie Ross shows us how to make an attractive mantle display using pumpkins, paint, and rick rack.

I hope you feel invigorated and ready to start decorating pumpkins.  I know I sure do!!

13 Halloween Crafts Using Baby Food Jars

13 Halloween Crafts Using Baby Food Jars - Adorable!

If you are like me you hate throwing away baby food jars.  These jars have such a nice shape and they’re in perfectly good condition after only being used once.  Our family is temporarily out of the baby food stage right now but with a little one on the way it won’t be long before I’ll have more tiny glass jars coming in.  Call it nesting, or being creative but lately I’ve been thinking of new ways to organize and reuse the things we already have.  We have plenty of leftover baby jars because it was so hard to put them all in the recycle bin and today I decided I want to find a good use for these jars.  Some may end up holding lost buttons, spare change, or my daughter’s crayons but some will definitely be used to make some crafts.

Today, I have a round up of adorable Halloween crafts to share with you.  I hope you’ll enjoy them!  If you do please feel free to pin the image above to share these ideas with others.

Let’s get started!

1.) The 36th Avenue shows you how to make glitter slime and adorable glitter monster jars to hold the slime!

2.) The uber talented Martha Stewart has a tutorial on how to make Jar-O’-Lanterns (the name is even cute!).

3.) ThinkCrafts.com has a simple tutorial to turn a jar into a chalkboard pumpkin. They don’t use baby food jars but I think they could easily be substituted.

4.) Crafts by Amanda has a brilliant idea for using old lids from bottles to make monster faces.  Again, you could easily substitute baby food jar lids here.

5.) Pink Cake Plate shares a simple craft using dollar store items and baby food jars (or other jars) to make owl apothecary jars.

6.) Kerry on Family Crafts shares how she easily turned full baby food jars into spooky decor.

7.) SmallTypes.com has a tutorial for turning baby food jars, wire, and stickers into a sweet mantle decoration.

8.) TheAutoCratHaley.com shares a simple ten minute craft for making sweet treat jars.

9.) Lil’ Luna tells how she baked mini cakes inside a small mason jar and I think this would also work in a large baby food jar.  Yum!

10.) Michelle Paige has a unique take on Halloween goodie jars.  She uses black and white houndstooth duct tape on the outside and marshmallow peeps on the inside.  Cute and sweet!

11.)  Crafts Redesigned shares a simple tutorial to make a not-so-frightening mummy luminary.

12.) I Heart Nap Time tells how she made cute gift jars using scrapbook paper, ribbon, and lace.  This is adaptable for any occasion!

13.) BHG.com shares how to make an adorable Frankenstein face candy jar using a baby food jar and items from a craft store.

That’s all the jar crafts I have to share for now but keep checking back because I’m sure I’ll find some more creative ways to use baby food jars and maybe I’ll even show you a few ways we’re already using them in our home.

What ways do you repurpose baby food jars?

Fab ReHab

Happy Monday Lovelies,
If you know me at all, you know how much I love
volunteering at my local
Habitat for Humanity ReStore.
I thought I’s share a few  
 chair ideas my friends and I have
come up with.
 
This is a garden seat.
We used an old ladder back chair, chicken wire, moss,
plants and a decorative wire bird.

Garden Seat of Faith

This is different chair 
as she arrived at the ReStore.

Chair Before

Here she is in all her glory.
 
Monogram chair
 
 
I painted her and reupholstered her with a monogram pink velvet seat.
This was my first reupholstering job.
I loved this project, but did learn that I need a
new staple gun and a work table.
 
all images owned by Zoe Elmore

Dollar Bill Flower Bouquet

Dollar Bill Flower Bouquet

Would you like to make an adorable Dollar Bill Flower Bouquet like this one?  If so, go here to check out this YouTube video for step by step instructions craft your own.  My sister-in-law and her kids made this unique birthday gift for our niece.  Isn’t it cute?  They filled the vase will Jolly Ranchers and topped off the design with colorful ribbons.

This would be a perfect graduation gift or the perfect birthday present for a kid of any age!

DIY Paint Decorated Starbucks Bottles

Let’s see a raise of hands, who  in here has a love of Starbucks?  I thought so, I love it too.  For me, it’s only a treat for special occasions because my husband doesn’t like it, it’s costly, and it’s usually out of the way to get to one.  However, I get the Starbucks bottles at Walmart about once a month.  I’ll buy them if they have a coupon attached and I’m craving one or my husband will buy them for me when he knows I’ve had a hard week.  Isn’t he the sweetest?  I am very blessed to have him!  Long story short, I have a small collection of Starbucks bottles accumulating at my house.  After I collect 8 or so I force myself to put them in the recycling bin but it seems like such a shame wasting a perfectly good, beautifully shaped bottle.  I don’t know why but I’m pretty much in love with the shape and size of their bottles.  This brings me to why I’m writing here today, I’m going to show you how to repurpose old Starbucks bottles into a lovely home decor item.

DIY Paint Decorated Starbucks Bottles

Let’s begin, shall we?

Here are the materials you’ll want to have on hand before you begin:

  • -Starbucks bottles with the labels peeled off and washed clean.
  • -Spray primer {this is optional but recommended if the bottle will be handled much}
  • -Puffy paint {the color doesn’t matter}
  • -Spray paint in all of the shades and finishes you want to use.
  • -Sharpie

I’ve seen so many of these DIY bottle ideas on Pinterest but I while I love the idea I don’t like how the finished product looks.  I think it’s because hot glue guns are so hard to manipulate and get precisely where you want it.  One day it dawned on me, why not use a little bottle of paint?  A small bottle that could fit in your hand seemed genius to me!  My first trial run with this wasn’t a huge success because I bought a small squeeze bottle of paint but it wasn’t puffy paint and no matter how many coats I applied it still dried flat.  Make sure you buy puffy paint!

I primed the bottles with the spray paint and because I’m a mom I waited a few days before I could get back to it.  I believe that you should be fine to continue after a few hours but check the spray paint can just to be sure.

Next, I used a Sharpie to draw out the design I wanted.  I was careful to draw the letters far apart, taking into account the thickness of the paint.  Oh, I almost forgot!  It’s not a huge deal but it kind of bothers me…make sure you turn your bottles so that you aren’t writing where there numbers or dots on the lower portion of your bottle.  There are blank sides but for some reason this didn’t dawn on me until I was completely finished.

DIY Spray Painted Bottles

Then, I applied my Puffy Paint.  This is very easy to do!  I even did this while I was talking on the phone with my mom.  If you’ve never worked with Puffy Paint before, it’s simple to use.  It’s very similar to decorating a cake.  You bring the tip to the bottle, squeeze slightly, then lift the tip up as you continue with light pressure slowly guiding the bottle around.  You’ll want to use your arm to guide the bottle around and not your hand.  I don’t mean to complicate this step, it’s really simple!  Besides, if you mess up all you have to do it let it dry, peel it off, and start over.

Spray Painted Bottles

Now all that is left is the spray painting.  I chose Krylon spray paint because this brand had three colors that I thought would go well together but you can use any brand or color that you like.  I just applied one coat of each even though the can recommended two coats.  Although, I skipped this step, if your bottle is going to be regularly used you’ll probably want to give it a coat of polyurethane.

DIY Paint Decorated Starbucks Bottles

There you have it, folks!  Simple DIY Paint Decorated Bottles.  I hope you like this tutorial and if you did please pin it to help share it with others.

Make a Pretty Spring Wreath!

I’ll admit it: I’ve had coffee filter wreath-envy ever since a friend made one at Christmastime.  It was lacy-white, beautiful in its simplicity, and striking with a bright ribbon ready for the hanging.

I wanted one.  I needed one.  But Christmas came and went and oh!  I never made one.

But I couldn’t get it out of my mind.

I began dreaming of a coffee filter wreath fit for spring.  I wanted something softly variegated, like tea roses, something that would make my spring mantel pop and my front door say “Welcome.”

I wanted something like this:

DIY Coffee Filter Wreath

It’s breathtaking.

It’s inexpensive.

And, it’s a very simple project to undertake.  In fact, you can start today.

First, gather the following supplies:

*1 foam wreath form, 12”

*Extra yarn, ribbon, or fabric strips, enough to cover the wreath form, optional

*I package of white basket-style coffee filters (I used 3” filters)

*Hot glue gun and plenty of glue sticks

*Ribbon to finish

*Food coloring

*I cup strong black tea, cooled

Step 1—Wrap the Wreath Form

I like to wrap foam wreath forms in a coordinating ribbon, yarn, or fabric strips.  This is not completely necessary but it allows me to be a little less perfect in the placement of my coffee filter flowers because  it doesn’t matter if a little bit shows through between the flowers.

Also, I like my wreaths to be finished on all sides.  It gives a nice, professional appearance to the final product.

Step 2—Dye the Filters

Variegated Coffee Filter Wreath

Using food coloring, dye several bowls of water any shades you like.  Keep in mind that the colors will dry lighter, so don’t be afraid to make deep, concentrated hues.  I used red, purple, green, and blue.  I also brewed a cup of strong black tea because I wanted some of my filter flowers to resemble dried roses.  The flowers I double-dipped in tea ended up being my favorites.

Working in batches of 5-8 filters at a time, begin by folding the filters into half, and then half again so you’re working with a manageable quarter-circle.   Scallop the edges with a scissors so they will look like flower petals when you fold them.

Dip the wider end of the circle into the color of choice.  Take it out of the water and allow the color to seep to the middle.  Double dip, if desired, in another color until you get the look you want.  The filter will draw the colors into the middle, lightening as it goes.

Be sure to dye at least 100 filters.  You will need all of them for this project!

Step 3—Drying

To dry, spread the filters flat on a cookie sheet and place them in a warm oven.  There is no need to separate them.  Just keep them in the groups you dyed them in.  But be sure to turn off the oven once you put the filters in to prevent them from burning.  Rotate occasionally until dry.

If you have a food dehydrator, you can use it to dry the filters.  They dry very rapidly on the highest setting so check back often.

Step 4—Create Filter Flowers

Creating flowers out of the dyed filters is time consuming.  There’s no way around it.  So, plug in your glue gun, put on some great music, and plan to stay awhile.

You don’t really need directions from this point on, but if you’d like to know what I found to be the most effective technique for making filter flowers, read on. 

DIY Coffee Filter Flowers

Click on the photo for a close-up look.

Working in batches of 4-5 filters, fold the filters into fourths.  Cut circles out of the centers of the filters using a scalloped cut.  Unfold.  You should have two parts: a scalloped circle (the center of your flower) and a large, scalloped outer ring.

Take the center circle and put a dot of hot glue in the middle.  Pinch it together, bringing the scalloped edges up and rolling it slightly until it resembles the center of a flower.

Now, take the larger outer ring.  Make it into a flat figure 8, securing the inner edges with a dab of hot glue where they come together.  Place the flower center right onto the middle of the figure 8, glue and fold the edges up so they look like more petals.

You should have two loops on either side of the flower center.  Glue the middles of those two loops to the center flower.  You will have a few more smaller loops now.  Glue those to the center as well, always folding and gluing as necessary to create flowers.

Don’t worry if they’re not perfect.  Once you glue them onto the wreath, most of the imperfections won’t show anyway.

Set aside and repeat until you wonder what possessed you to do this project in the first place.

Coffee Filter Flowers

Step 5—Arrange the Flowers

I decided to group bunches of like-colored flowers in a pattern around my wreath, but a random pattern would be just as pretty.  Do what you like!

Save any “flower failures” to fill in the bare spots where no one will see.

Coffee Filter Wreaths

Step 6—Finish

Your choice of ribbon will determine the feel of your project.  A wide ribbon is elegant while a bright, thin ribbon is fun and festive.  Embrace your creativity until you find a look you love.

Then, enjoy your beautiful wreath all season long.

Coffee Filter Wreath Ideas