Shamrock Bead Craft for Kids

This post contains affiliate links for your convenience. 

Shamrock Bead Craft for Kids

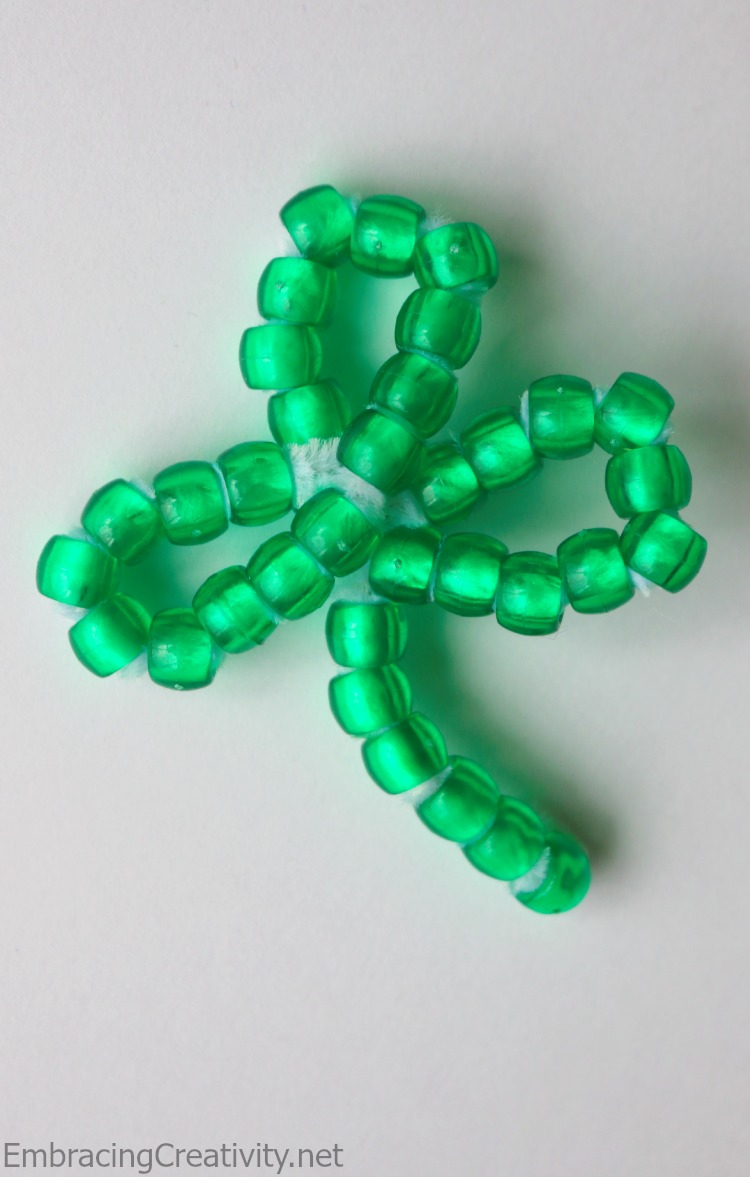
My daughter loves pony beads, I mean loves them!  Whether it’s stringing them on pipe cleaners or gluing them on paper.  She can’t get enough.  Maybe it’s because it’s one craft that she doesn’t need much help from me on.  I don’t mind because it’s a great exercise for her fine motor skills.

Yesterday, she asked to do a craft with beads.  After I scratched my brain for a moment I came up with this idea!  She loaded the pipe cleaner with beads and then I bent it into the shape of a shamrock.  We were originally going to hang it up as a sun catcher (with these suction cups) but she’s had too much fun carrying it around for that.

If you have a pony bead craft to share I’d love to hear about it!

Check out our other St. Patrick’s Day crafts:

Shamrock Craft for Kids

This post contains affiliate links.

Shamrock Craft for Kids

This shamrock craft took only moments to make and my daughter had so much fun making it.  She “painted” on the front of a card that we’ll be mailing to her grandparents for St. Patrick’s Day.

Clover Crafts for Kids

We used a shamrock cut out that we got from the dollar store.  You could always find a clover online, print it, and then cut it out too!  We taped it to our card (folded cardstock).  I found an unused pencil and let her loose stamping away.  Notice how she even made a design on the paper plate as she dotted the excess paint.  What an arteest! : )

We used our favorite Crayola washable paint so it was okay if we accidentally got a little paint on her clothes.

Check out our other St. Patrick’s Day crafts:

St. Patrick’s Day Rainbow Craft

This post contains affiliate links.

St. Patrick's Day Rainbow Craft


This lovely piece of art has been hanging on my refrigerator for almost a year now.  I just love it!  I can’t take credit for it though.  My daughter made this craft with the help of her Sunday School teacher.  The idea is simple enough though that I wanted to share it with you in case you have a little one that might enjoy a rainbow craft.  Paper, glue, crayons, Fruit Loops, and cotton balls are all you need for rainbow magic.

Check out our other St. Patrick’s Day crafts:

Frozen Olaf Pumpkin

Frozen Olaf Pumpkin

By now, you’ve already been bombarded with 5 dozen sweet Elsa’s knocking on your door to say trick-or-treat, you’ve already handed out all of your candy, and you may have even put away all of your Halloween decor.  I know, I know, it’s a little late to be posting about a pumpkin but this Olaf inspired pumpkin was too cute not to show you.  Isn’t it darling?  A friend of mine made this Olaf pumpkin with her sweet daughter and gave me permission to share it.  I just love it!

Fall Tulle Wreath

Fall Tulle Wreath

This lovely wreath was made quickly using tulle and a metal wreath frame.  Simply curl the tulle and tie small sections around the metal frame.  Repeat until you get the thickness you’d like.  This wreath was completed by tying a cheap “Welcome” sign to the front of the wreath.  Voila!  This inexpensive wreath is adorable and can be made while watching TV one evening.

If you like this wreath please pin it so you can find it later and check out our Pumpkin Tulle Wreath too.

Leaf Craft for Kids

Leaves Craft

Now that fall is upon us our trees are starting to turn into the beautiful colors of autumn.  Instead of just raking up your leaves take a few minutes to enjoy them with this simple leaf craft for kids.  My daughter and I loved it!  It was fun to go outdoors, explore a little bit, and then come back inside to craft.  We tried crafting on the porch but it was too windy for that.

In case you can’t tell what my marvelous drawings are, one is a butterfly, one is a turtle, and one is a caterpillar who just took a bite out of that leaf.

Materials:

  • – Paper
  • – Pen/Marker
  • – Leaves
  • – Glue
  • – Small twigs (optional)

Directions:

Take a little stroll together around your yard and gather leaves of all sizes, shapes, and colors. Come back inside and lay out your treasures.

Come up with an animal or insect you would like to draw and play around with your leaves to see which ones resemble your animal.  Glue the leaves to the paper and then draw the remaining part of your picture.  Add small twigs or other crafty supplies to further embellish your creations.

You could draw a little caterpillar who ate his way through the leaf like I did on one of mine or you could draw a bunch of people and make them have crazy hair with leaves.  The options are endless.

Be silly, have fun, and enjoy nature!

Pumpkin Tulle Wreath

Pumpkin Tulle Wreath

This beautiful and inexpensive wreath was made using leftover tulle from a local girl scout parade float.  It’s never too early to teach kids about recycling and repurposing.  Look what beautiful decor was made from what would have otherwise been trash.  My daughter knows that any left over plastic container will be reused in our house.  They’re mainly used to store loose craft odds and ends but that’s another story.

Take a styrofoam wreath and wrap the tulle around, securing it with straight pins.  Add a little brown and green tulle for leaves and a stem.  Tie a burlap ribbon, add a little raffia, and voila!  You’re finished before you know it.

I hope you enjoy this pumpkin wreath craft as much as I did!

DIY Monogram Wall Art

DIY Monogram Wall Art!

This simple DIY is all about making something individualized and colorful for your home. Using glass pebbles a wooden letter, and a few things you probably having lying around your house, we’re going to create a stylish initial to liven up any bare wall.

Okay, so here we go. All you need is the letter of your choice, glue (a hot glue gun worked great, available at any craft store), a wooden frame (it’s optional but this one came from Dahlia’s Flowers) and glass pebbles (or gems, marbles, fish tank decorations. You know what I’m talking about, right?).  Keep in mind the color of your letter when choosing the color of your pebbles.  Since they are slightly see through your background color will make a difference.

Instructions:

  1. Buy supplies.
  2. Arrange pebbles on your letter to suit your taste. Remove row of pebbles from your letter and glue them back into place one or two at a time. Continue to fill in the entire letter, section by section, until complete.
  3. Allow a few minutes for the last pebbles to dry before hanging.
  4. If you want to hang a bare frame around your letter you would do that now otherwise you’re finished.  Yay!
  5. Stand back and admire your creative and inexpensive piece of art!

This DIY Monogram wall art would make a great baby gift for new parents.

DIY Letter Art

Just look how cute it is above the crib in my friend’s nursery!

Simple DIY Wall Art

If you found this helpful, pin it so you can share it with others and access it later!

Thank you, Stephanie for sharing your simple DIY monogram art!  If YOU have a project you would like featured you can submit it here.

How to Create a Transparent Watermark in PicMonkey

How to Create a Transparent Watermark

Watermarking your photos is your first defense against photo theft.  This is a simple tutorial to teach you how to make a transparent watermark that you can simply paste on top of your photos.  Let’s get started, shall we?  To begin go to PicMonkey.com.

1.) Create a Collage

Watermark Tutorial

Open the Collage feature (if it prompts you to add photos just choose the sample photos they provide).  Then click the “X”  in the top right hand corner of 2 boxes.  You should be left with one large white box.  Don’t worry about the size of it at this point.

2.) Save a Transparent File

How to make a transparent logo

Click the Background tab and the check the box beside “Transparent background.”  Don’t worry, your image is still there.  It’s just invisible now.  

Save your image using the “Save” at the top of the page, name your background image, then save it as a .png file.  This is important, it has to be a .png file.  You can now close the Collage editor by clicking on the “X” in the upper right hand corner of the page.

3.) Create a Logo

Creating a transparent watermark

Use the Editor feature to open your transparent background file.  Those boxes won’t be in your image; they’re just there to let you know the dimensions of your transparent image.

Click on the Text tab and add the text you want on your logo.  Experiment with fonts to find one that’s easy to read and that best represents your brand.  You can also change the color at this point but it’s common to use either black or white.  Pick a font size that is fairly large, somewhere around 80-100 point should be good.  You can always resize it smaller when you add it on top of your image but making it bigger would make it look grainy.

If you’d like to add an image with your name you can browse PicMonkey’s collection of overlays.  For this tutorial I chose to add a black button and then rotated it slightly.

4.) Crop Your Logo

Transparent Watermark Tutorial

Once you’re happy with the way it looks go to the Basics tab and crop it tightly around your image.

5.) Save Your Transparent Watermark

How to make a reusable watermark

Go now and save it to your computer as a .png file.  It needs to be a .png file to be transparent so double check and make sure you’ve selected the right option.

That’s it!  Now you can have a professional consistent look on all of your images.  Don’t you feel savvy?

**Updated!**  To add it to your image follow these steps:

– Go to the “Overlays” tab.

– Choose “Your Own” option at the top.

– Select your transparent .png file from wherever you saved it.  Voila!

If you found this post helpful please pin it so others can find it!

Key to my Heart – Free Valentine Printable

Key to my Heart - Free Printable!Who holds the key to your heart?  Why not let them know with this free printable?  This can be printed, cut out, and used as a tag on a gift, it can be left as a little love note for your sweetheart to find, or my favorite way, you could tie it onto your love’s key ring for a thoughtful surprise in the morning. Not to mention all the cute ways you could use this to give a gift to a child or to an adult from a child. {Please note that the EmbracingCreativity.net watermark won’t appear on the printed copy.}

I’m planning on doing 14 Days of Valentine’s for my husband this year. On Valentine’s Day this year we’ll both be sleep deprived from our newborn, who should be due shortly before, and I figured that small gestures and reminders of my affection will mean more to him than a store bought gift would. Plus, it will fit in our budget much better. Because I have to plan my 14 days out well in advance I figured I should share them with you in case you wanted to steal an idea here or there. I hope you enjoy these free Valentine printables and that you have a marvelous Valentine’s Day!

Go here to get the free Key to My Heart Download.